

Ever hopped into the shower, expecting a refreshing, high-pressure waterfall to wake you up, only to be met with a pathetic, stray stream that hits you right in the eye? Or maybe half the nozzles are completely silent, while others are shooting water everywhere except on you.
If your shower head looks like it’s growing its own tiny mountain range of white, crusty stuff, don’t worry: you aren't failing at adulthood. That’s just mineral buildup, and it happens to the best of us. Whether you’re a pro at staying on top of your weekly house cleaning or you prefer a bi weekly house cleaning schedule, the shower head is one of those spots that often gets ignored until it’s literally screaming for help.
At The Cleaning Ninjas Inc, we’re all about those high-impact, low-effort hacks that make your home shine. Today, we’re sharing one of our favorite "Ninja Tips": the vinegar soak. It’s cheap, it’s eco-friendly, and it’ll have your shower feeling like a five-star spa in no time.
The Science of the "Crust" (Keep it Simple)
Before we get into the "how-to," let’s talk about the "why." If you live in an area with hard water, your water is packed with minerals like calcium and magnesium. Over time, as water passes through your shower head and evaporates, these minerals stay behind. They build up, harden, and eventually clog those tiny little holes.
Standard bathroom cleaners often just sit on the surface. To really get in there and break down those "stalactites," you need something acidic. Enter: White Distilled Vinegar. It’s the secret weapon in any ninja’s cleaning kit. It’s acidic enough to melt away mineral deposits but gentle enough not to ruin your fixtures (with a few exceptions we’ll cover later).
What You’ll Need
You don’t need a fancy toolkit for this. In fact, you probably have everything in your pantry right now:
- White Distilled Vinegar: Do not use apple cider vinegar or balsamic (unless you want your bathroom to smell like a salad).
- A sturdy plastic bag: A gallon-sized freezer bag works best because it’s thicker and less likely to leak.
- Rubber bands or zip ties: To secure the bag.
- An old toothbrush: For the final scrub.
- A microfiber cloth: For the finishing polish.

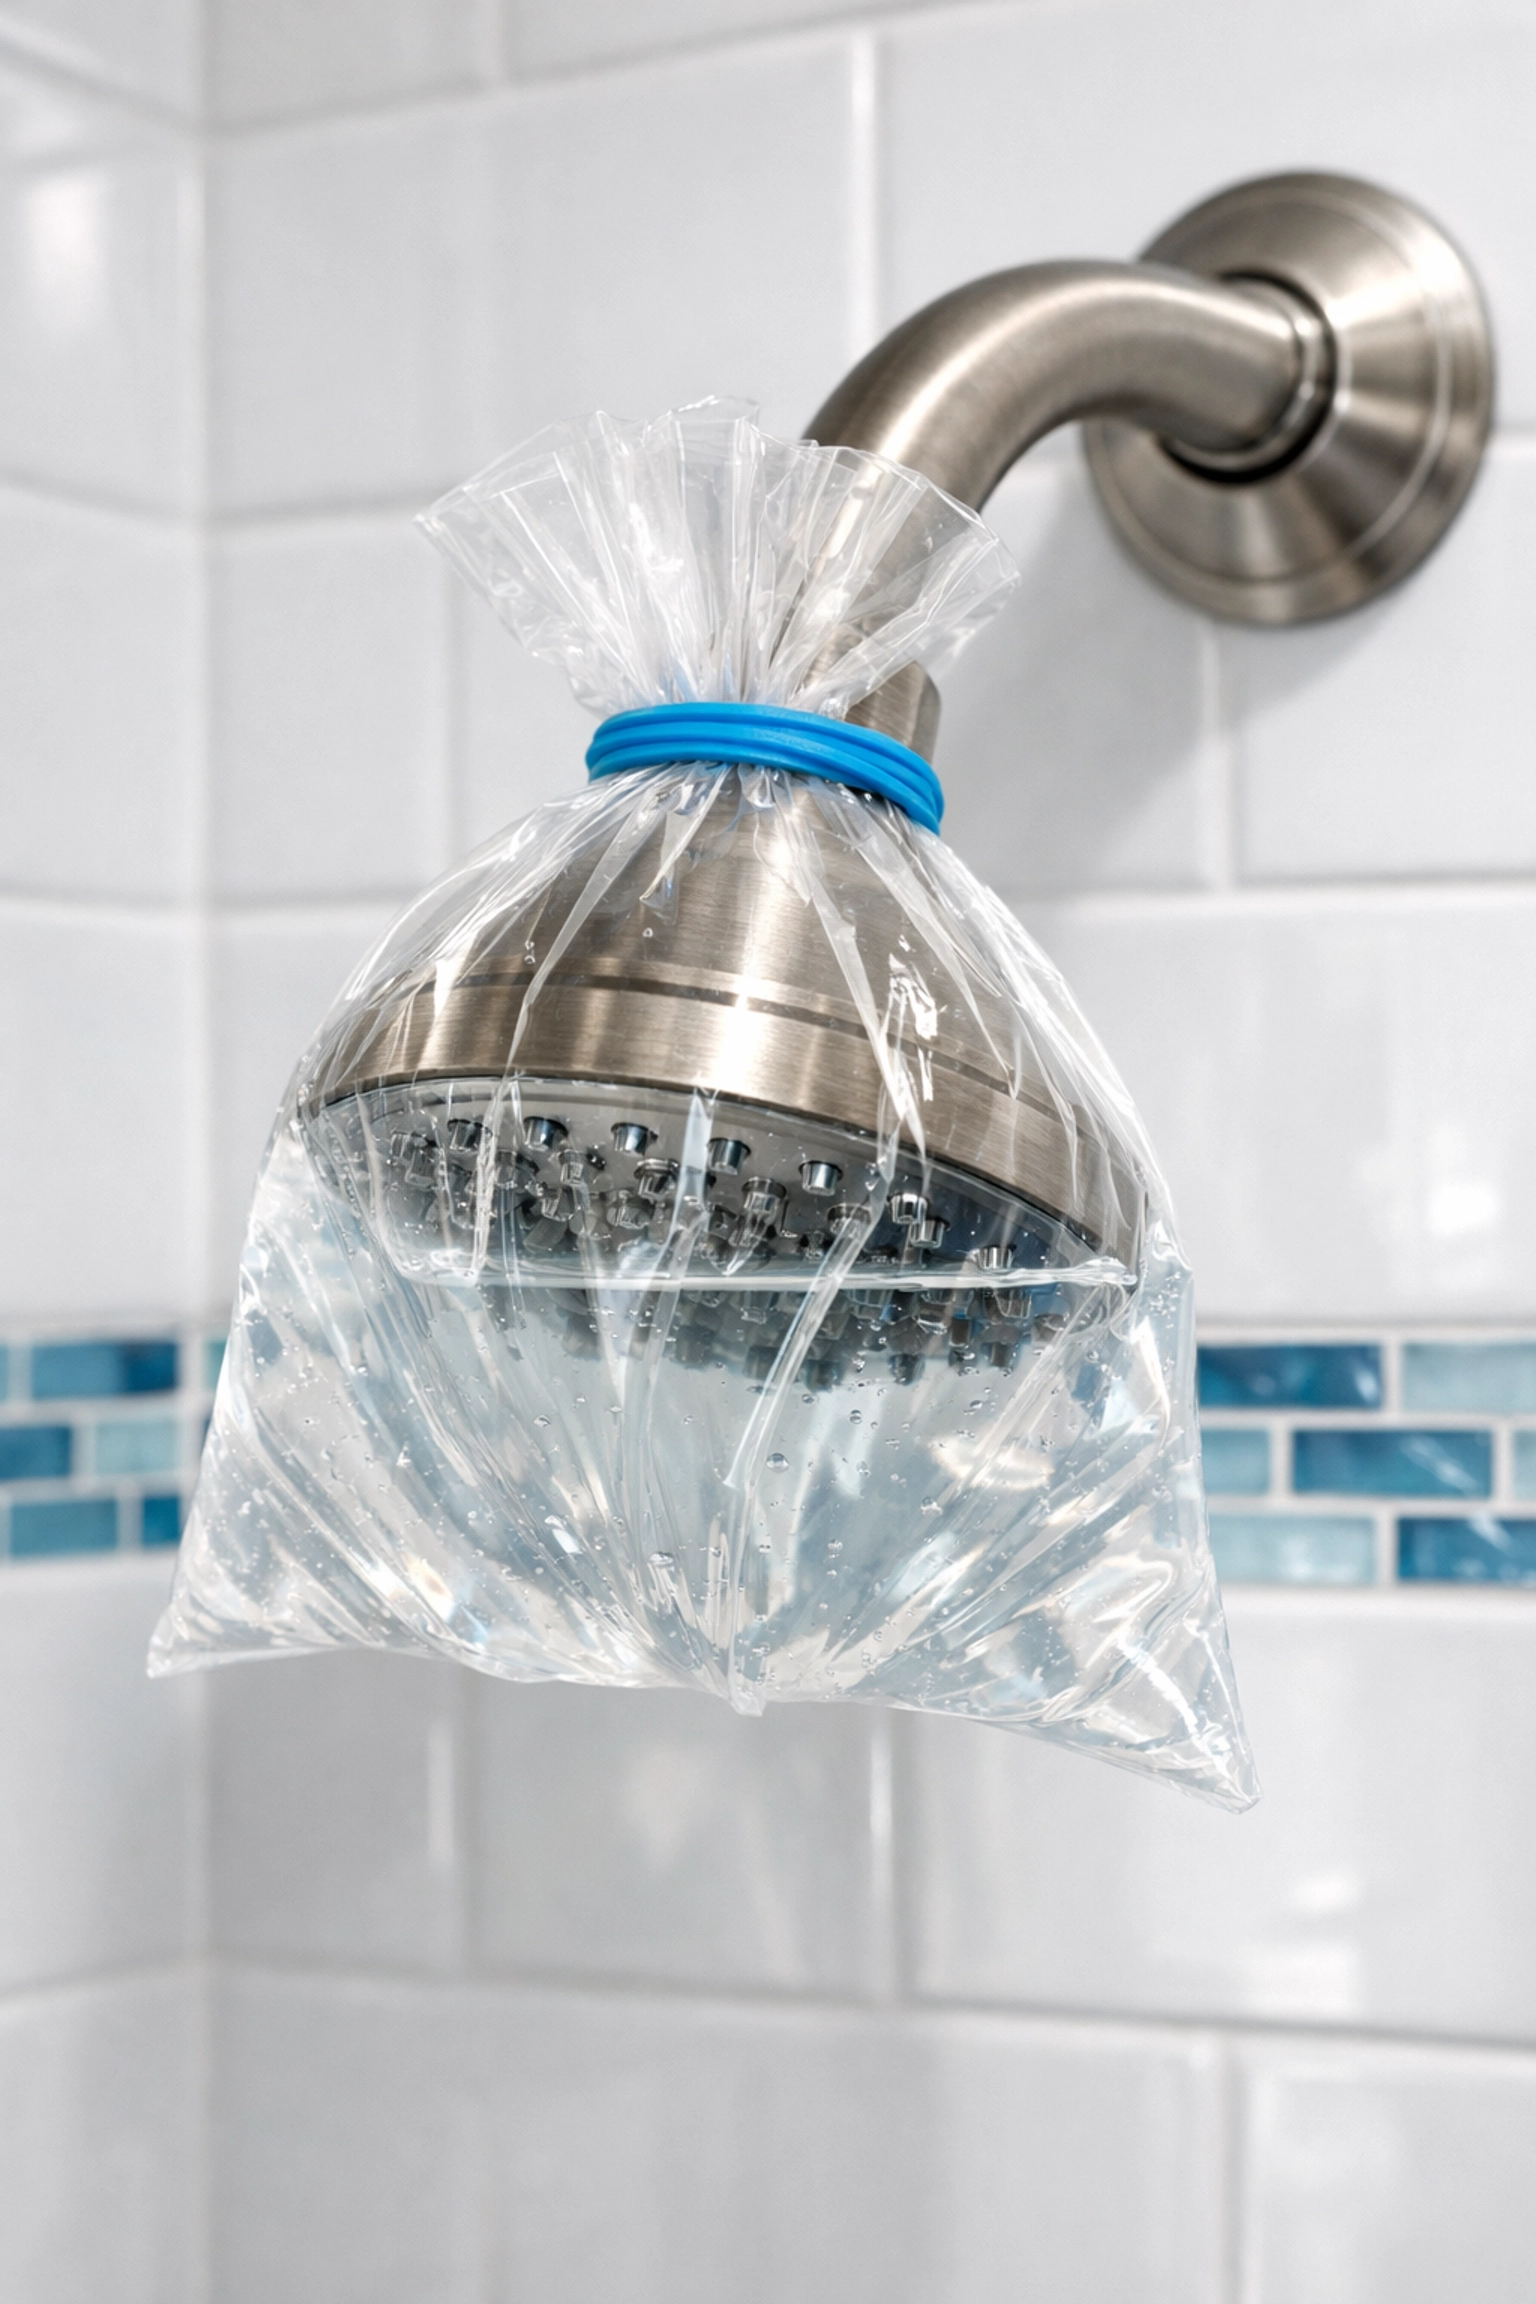
Method 1: The "Stay-Put" Soak (For Fixed Shower Heads)
Most of us have shower heads that are bolted directly into the wall. You don't need to be a plumber to clean these. Here is the Ninja way to do it without taking anything apart:
- The Test Fit: Before you add the liquid, grab your empty plastic bag and slip it over the shower head. Make sure it’s big enough to submerge all the nozzles.
- Fill it Up: Fill the bag about halfway with white vinegar. You don't want it so full that it overflows when you put the shower head in, but you want enough that the entire "face" of the shower head is underwater.
- The Submerge: Carefully slide the bag over the shower head until the nozzles are completely submerged in the vinegar.
- Secure the Perimeter: Use a rubber band or a zip tie to wrap the top of the bag tightly around the shower arm (the pipe coming out of the wall). Make sure it’s tight: you don't want a vinegar bomb exploding in your tub mid-soak.
- The Waiting Game: Let it sit for at least 30 minutes to an hour. If you’ve been skipping your bi weekly house cleaning for a while and the buildup is thick, let it soak for 2 to 4 hours.
- The Reveal: Remove the bag (carefully!) and pour the vinegar down the drain.
- The Finishing Touch: Run the hot water for a minute to flush out any loosened minerals from the inside. Use your old toothbrush to scrub away any softened gunk still clinging to the nozzles, then wipe it down with a microfiber cloth.
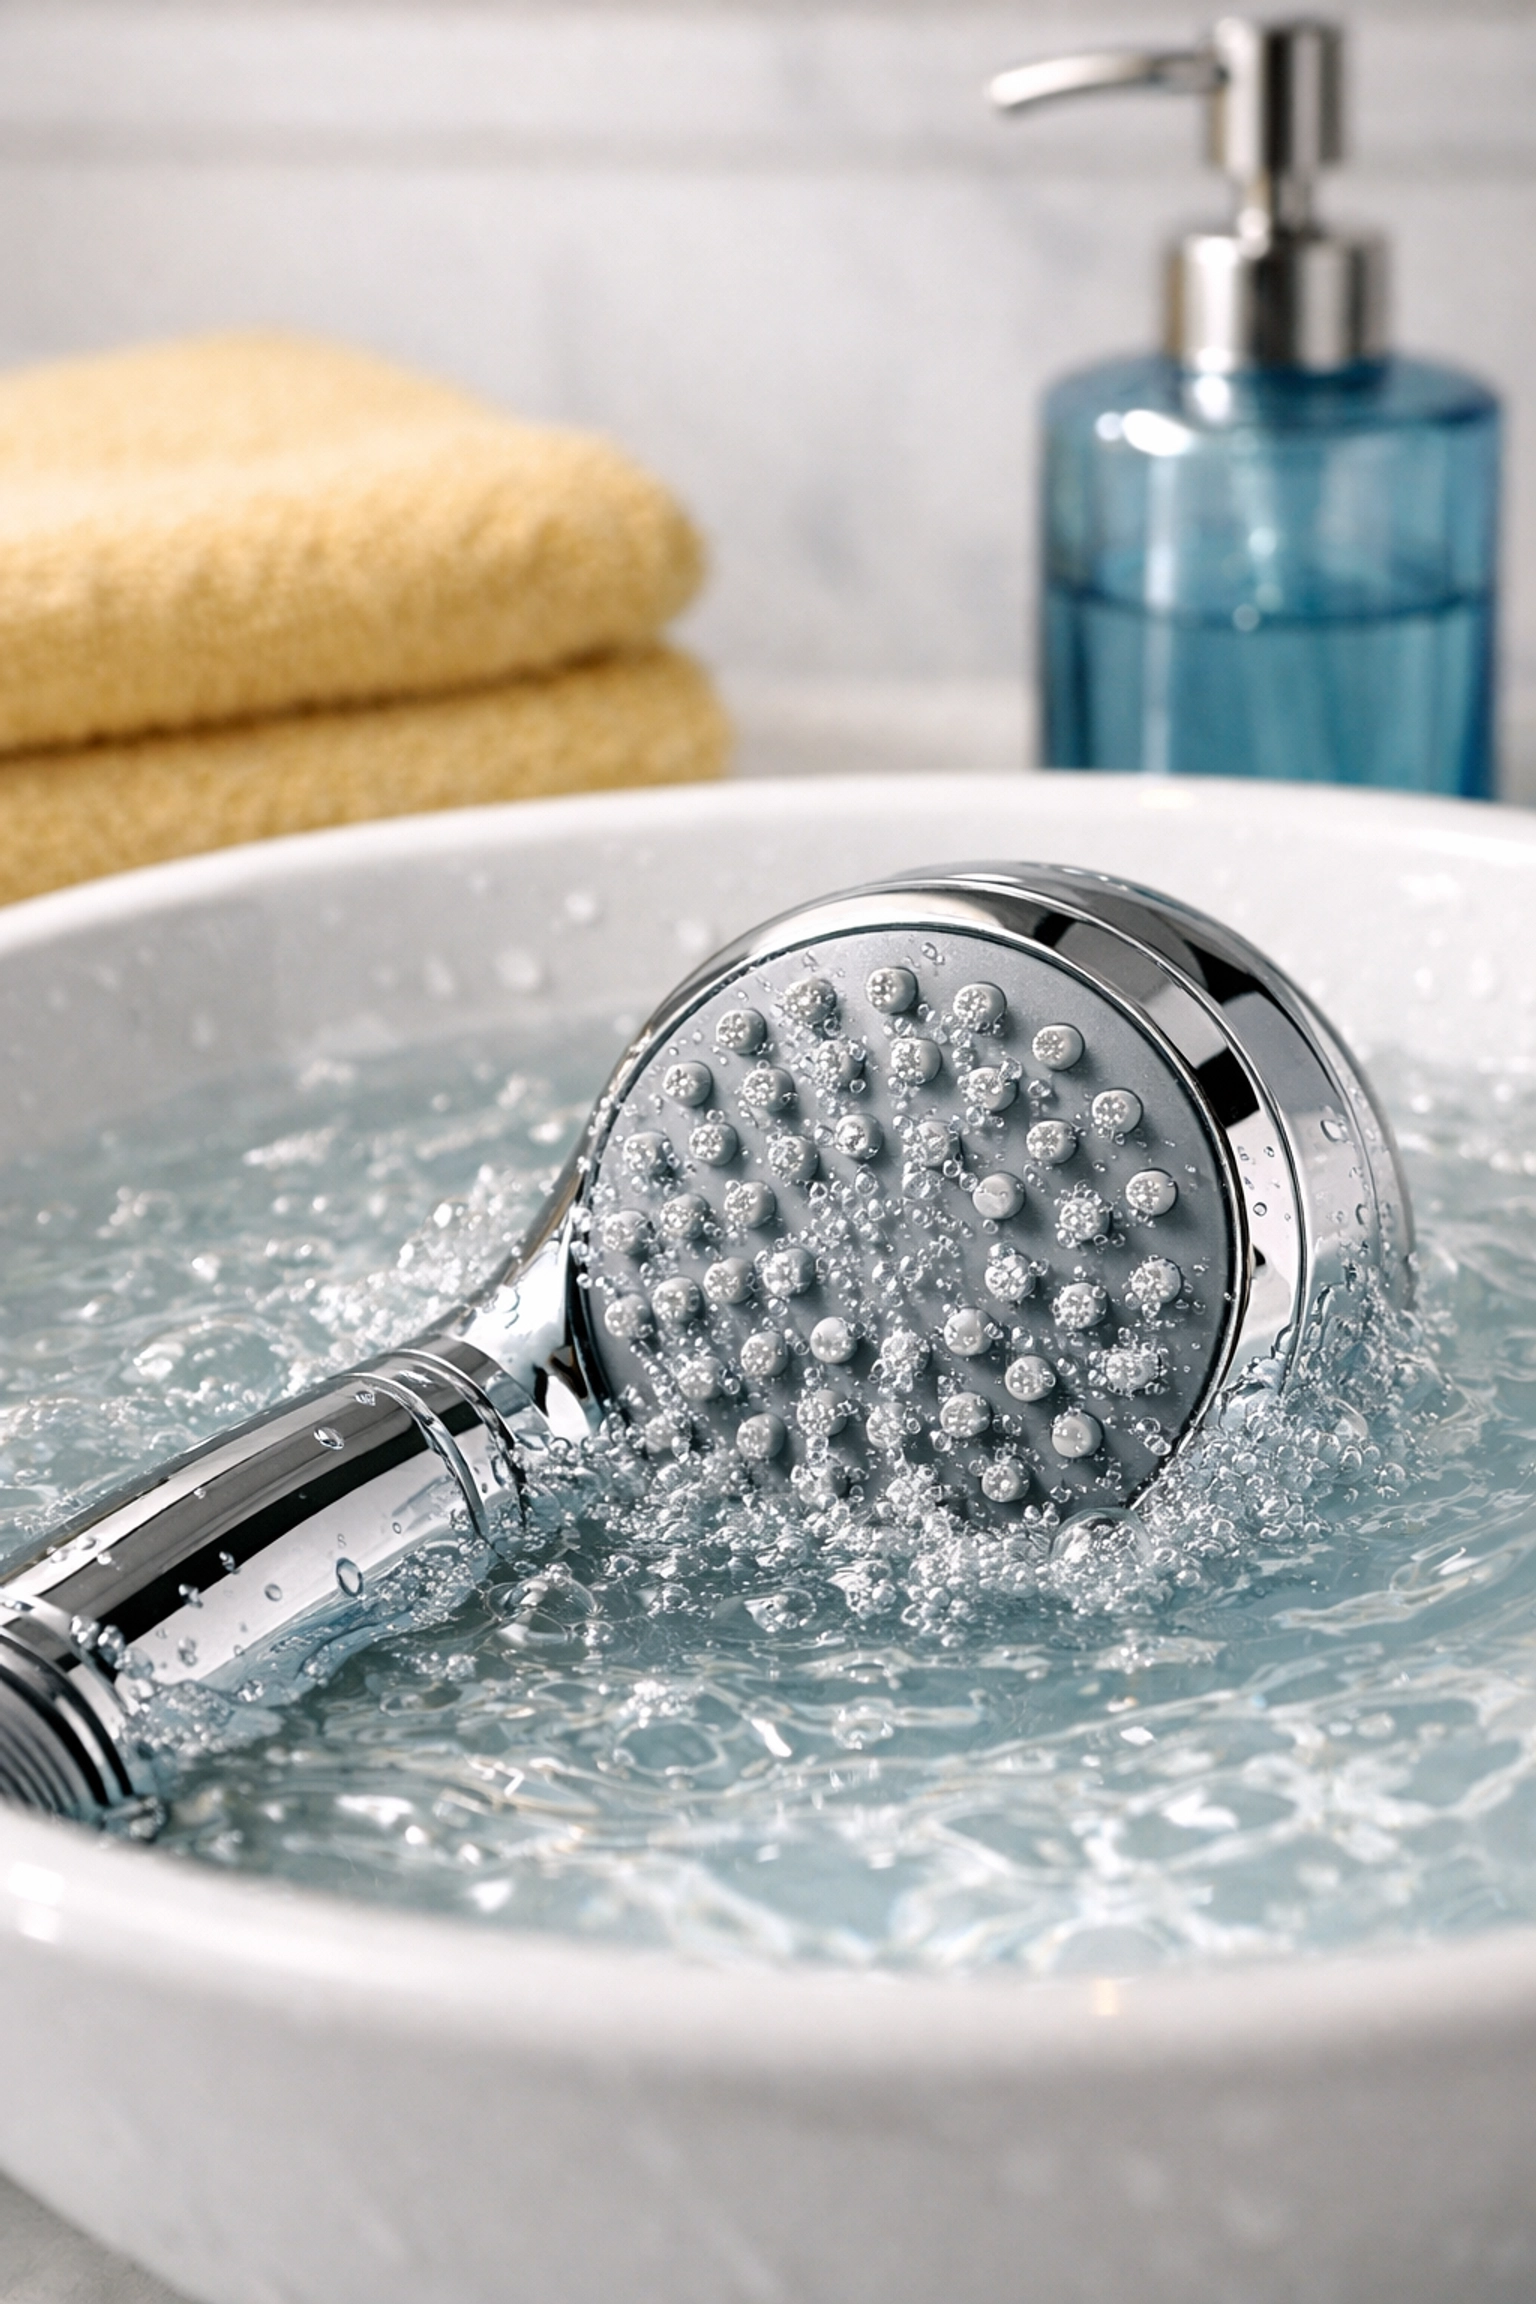
Method 2: The Deep Dive (For Handheld or Removable Heads)
If you have a handheld shower head or you’re comfortable unscrewing your fixture, the "Bucket Method" is even more effective because it allows for a deeper soak.
- Remove the Head: Carefully unscrew the shower head from the hose or the wall. Ninja Pro Tip: Watch out for the small black rubber washer (the O-ring). If that falls out and goes down the drain, your shower will leak forever. Keep it safe!
- The Vinegar Bath: Place the shower head in a bucket, a large bowl, or even your bathroom sink. Pour in enough white vinegar to cover it completely.
- Soak it Good: Since the head is fully submerged, the vinegar can get into the internal gears and connections. Let it soak for 1 hour.
- Scrub and Rinse: After the soak, give it a good scrub with that toothbrush. Pay extra attention to the little rubber nibs where the water comes out.
- Reattach: Screw it back on (don't forget that washer!), and run the water to clear the lines.
The Golden Rules (Safety First!)
While vinegar is a miracle worker, there are a few things you need to keep in mind to keep your bathroom looking sharp:
- Watch the Clock on Brass: If you have a brass, gold, or nickel-coated shower head, do not soak it for more than 30 minutes. The acid in the vinegar can eventually start to eat away at these delicate finishes.
- Skip the "Fancy" Vinegars: Always use white distilled vinegar. Malt or brown vinegars can actually stain your fixtures, which is the exact opposite of what we’re going for here.
- Ventilation: Vinegar has a… distinct aroma. It’s not bad, but it’s strong. Turn on the bathroom fan or crack a window while you’re letting it soak.
Why This Should Be Part of Your Routine
We often talk to our clients about the importance of maintenance. Whether you’ve hired us for weekly house cleaning or you’re handling things yourself, consistency is the key to a stress-free home.
When you ignore your shower head for months, the mineral buildup becomes "calcified": meaning it turns hard as a rock. At that point, a simple vinegar soak might not be enough, and you might find yourself needing to replace the entire fixture. By adding a quick vinegar soak to your bi weekly house cleaning checklist (or even just doing it once a month), you’ll extend the life of your plumbing and keep your water pressure at its peak.
Want More Ninja Tips?
Cleaning doesn't have to be a grueling weekend-long chore. It’s all about the little wins. This vinegar trick takes about 5 minutes of "active" work, and the results are immediately noticeable. There’s nothing quite like that first shower after a deep clean: when the water is actually going where it’s supposed to!
If you’re feeling overwhelmed by the rest of your bathroom (or the rest of your house), that’s where we come in. At The Cleaning Ninjas Inc, we specialize in taking the "to-do" list off your hands. From scrubbing the baseboards to making sure your kitchen sparkles, our team brings that "Ninja" level of detail to every home we visit.
Whether you need a one-time deep clean to hit the reset button or you want to set up a recurring weekly house cleaning schedule so you never have to think about mineral buildup again, we’ve got your back.
Check out our services to see how we can help you reclaim your free time. And if you want to learn more about the team behind the masks, head over to our About Us page.
Final Thoughts
A clean home is a happy home, but a clean shower is a peaceful home. Don't let a crusty shower head ruin your morning vibe. Grab a bag, some vinegar, and a rubber band, and let the science of the soak do the work for you.
Happy cleaning, and stay stealthy! 🥷✨🧹
