

Hey there, kitchen warriors and home chefs! If you’re anything like the team here at The Cleaning Ninjas Inc, your wooden cutting board is probably the MVP of your kitchen. It’s sturdy, it’s beautiful, and it’s been through a lot, from chopping pungent onions to slicing up juicy watermelons. But here’s the thing: wood is a living, breathing material. Unlike plastic boards that you can just toss into the dishwasher (please don’t do that with wood!), your wooden boards need a little extra TLC to stay hygienic and looking their best.
In the world of weekly house cleaning, we often see kitchen counters that are sparkling, but the cutting boards are looking a little… tired. Maybe they have some deep knife grooves, a lingering scent of last week’s garlic, or some mysterious stains. Don’t worry! We’re going to walk you through the ultimate guide to deep cleaning your wooden cutting boards using eco-friendly methods that are safe for your food and your family.
Why Wood Needs a "Spa Day"
You might wonder why we’re making a big deal out of a piece of wood. Well, wood has a natural capillary action that can pull moisture and bacteria deep into its fibers. While some woods have natural antimicrobial properties, they aren't invincible. Over time, the wood dries out, cracks appear, and those cracks become high-rent districts for bacteria to move in.
If you are keeping up with a bi weekly house cleaning routine, you’re likely wiping the board down after every use. That’s great! But once every few months, it needs a deep clean and a conditioning treatment to seal those fibers back up. Think of it as a spa day for your kitchen tools.
Step 1: The Pre-Clean Scrape
Before we get into the "chemistry" of eco-friendly cleaning, we need to handle the physical debris. If you’ve been heavy-handed with the sourdough or carving a roast, there might be stuck-on bits that a simple sponge won't budge.
Take a bench scraper or even a blunt kitchen knife and gently scrape the surface of the board. You’ll be surprised at the tiny amount of "gunk" that comes up. Getting rid of this surface debris ensures that our cleaning agents can actually reach the wood itself.
Step 2: Banishing Stains with Baking Soda
Is your board looking a bit dingy? Maybe some beet juice or turmeric left its mark? Reach for the baking soda. This is a staple in the The Cleaning Ninjas arsenal because it’s non-toxic and incredibly effective.
Make a thick paste using:
- 2 tablespoons of baking soda
- 1 tablespoon of hot water
Smear this paste over the stained areas and let it sit for about five to ten minutes. Then, take a sponge or a soft brush and scrub in circular motions. The baking soda acts as a mild abrasive that lifts the pigments out of the wood grain without scratching it. Rinse it off with warm water and pat it dry.
Step 3: Neutralizing Odors with the Lemon Trick
If your board smells like a permanent onion factory, soap and water usually won't cut it. The acids in citrus are fantastic for breaking down the organic compounds that cause those funky smells.
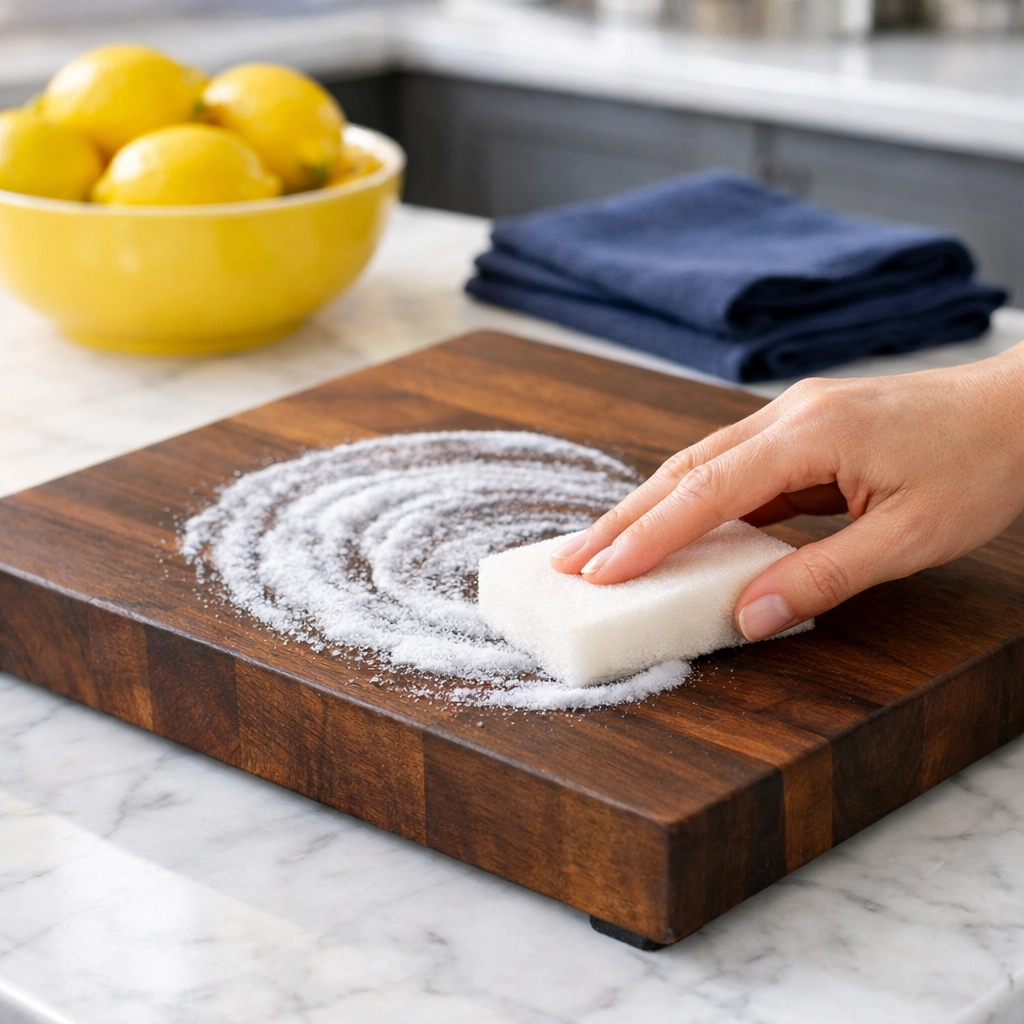
Take a lemon, cut it in half, and dip the cut side into some coarse sea salt. Use the lemon half as a "scrubber" and work it all over the surface of the board, squeezing slightly as you go to release the juice. The salt acts as an abrasive, and the lemon juice deodorizes and brightens the wood. This is one of our favorite eco-friendly hacks because it leaves your whole kitchen smelling like a lemon grove!
Step 4: Dealing with Deep Grooves (The Sanding Secret)
If your board has seen years of heavy chopping, it might have deep "scars" or grooves. These are the perfect hiding spots for bacteria, and no amount of scrubbing will reach the bottom of a deep knife mark.
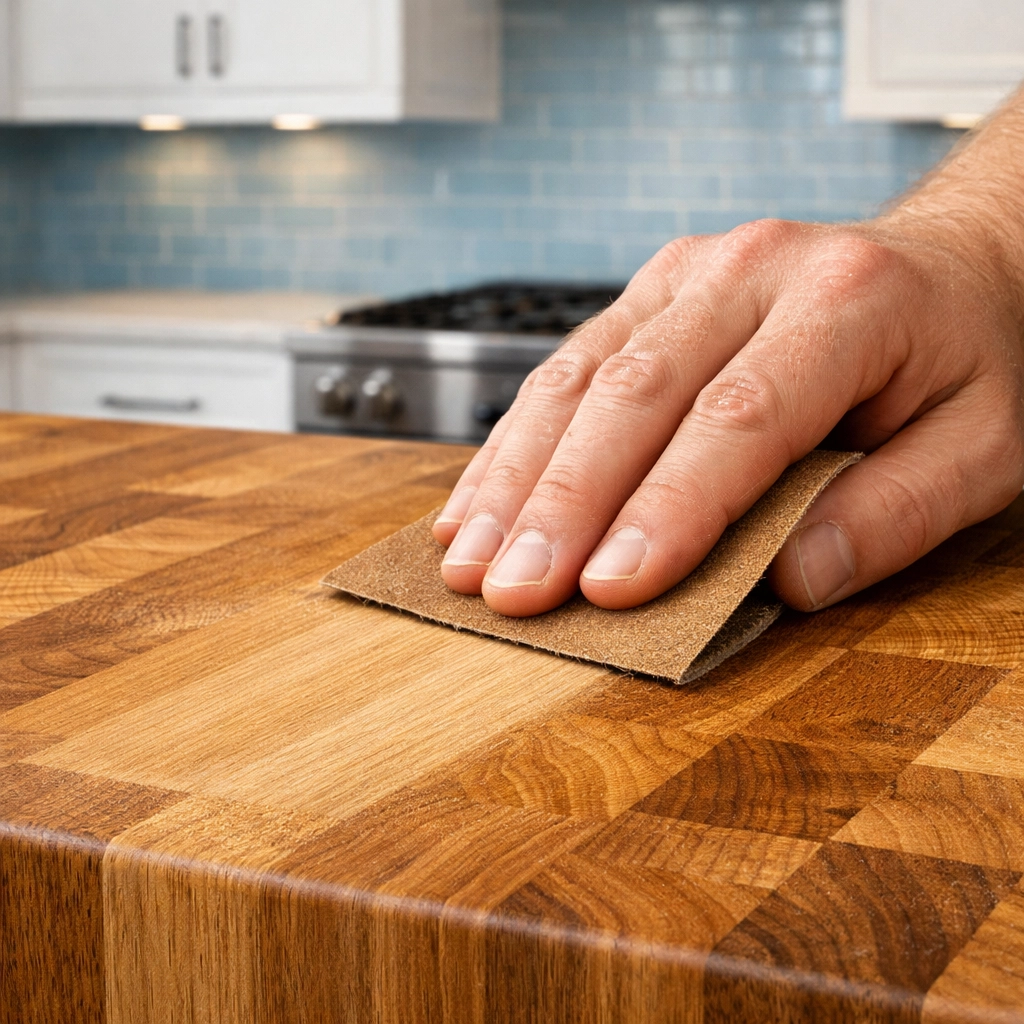
This is where we go from "cleaning" to "refurbishing." Grab some sandpaper from the garage. You’ll want to start with a medium-grit (around 80 grit) to level out the deep marks. Always sand with the grain of the wood, never across it! Once the deep marks are gone, switch to a finer grit (100 or 120) to smooth it out, and finish with a very fine grit (150 or higher) for a buttery-smooth feel.
After sanding, you’ll need to wash the board thoroughly to remove all the fine wood dust. It will look a bit "raw" and pale after this, but don't worry, the next step will bring it back to life.
Step 5: Sanitizing Safely
We know what you’re thinking: "Can I use bleach?" While a very diluted bleach solution is technically "safe," we prefer eco-friendly alternatives. If you’ve been cutting raw meat on your board, you definitely want to sanitize it.
A solution of one part white vinegar to four parts water is a great general cleaner. However, if you need a heavy-duty kill-off of germs, a quick wipe with 3% hydrogen peroxide is a powerful, non-toxic option. It will fizz a little as it works, which is a sign it’s doing its job! Just wipe it on, let it sit for a minute, and rinse.
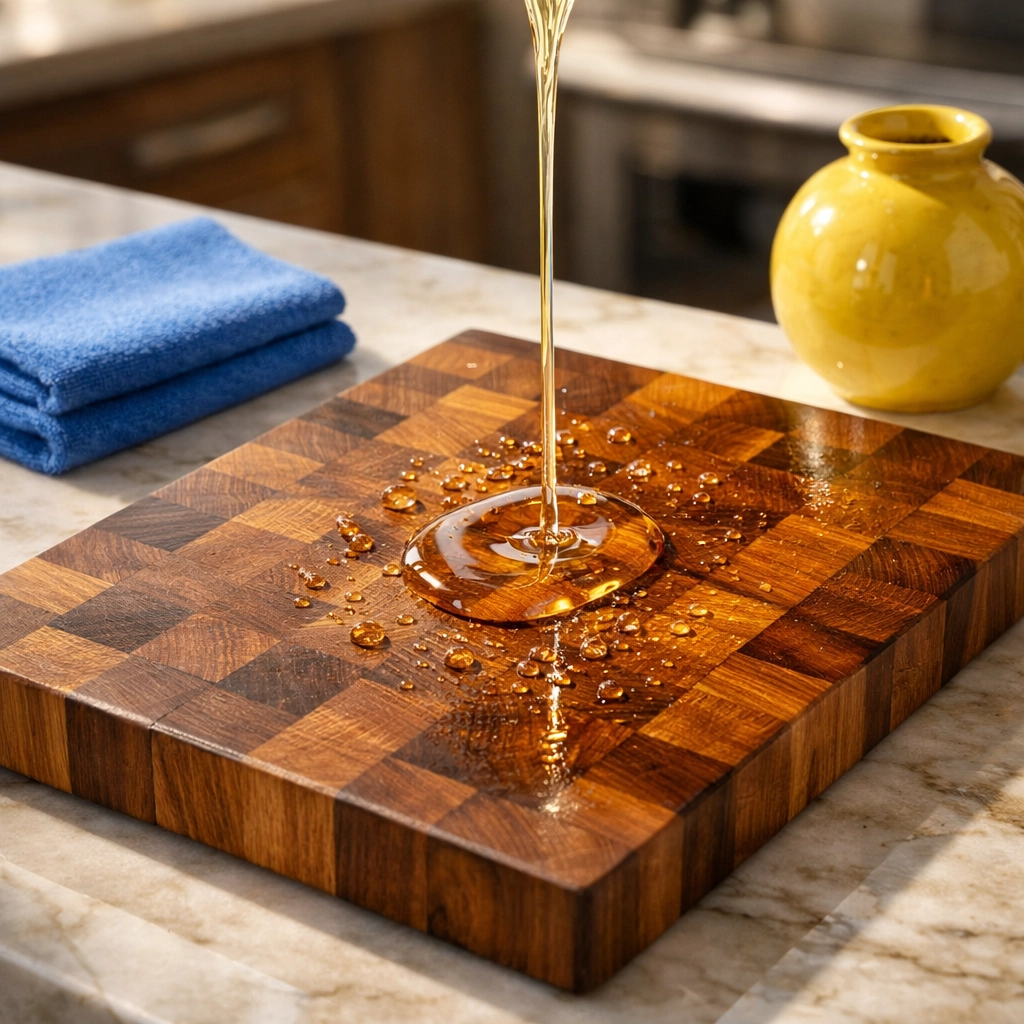
Step 6: Conditioning the Wood
This is the most important step in the deep cleaning process. If you clean and sand your board but don't "seal" it, the wood will remain thirsty and prone to cracking.
You need a food-grade mineral oil. Do NOT use vegetable oils like olive or canola oil, these are organic fats that will eventually go rancid and make your board smell terrible.
The Ninja Process:
- Ensure the board is completely bone-dry.
- Apply a very generous amount of mineral oil.
- Use a clean cloth to spread it evenly.
- Let it sit overnight. The wood will "drink" the oil.
- In the morning, wipe off any excess with a paper towel.
When you’re done, your board should have a beautiful, deep glow and water should bead up on the surface instead of soaking in.
Step 7: The Correct Way to Dry
How you dry your board after a daily wash or a deep clean matters more than you think. Never, ever lay a wet board flat on your countertop. Moisture gets trapped underneath, which is a recipe for mold and warping.
Always stand your board upright in a dish rack or lean it against the backsplash so air can circulate on both sides. This ensures it dries evenly and stays flat.
Maintaining the Magic
Deep cleaning is something you should do every few months, but how do you keep it up in between? If you have a busy household, keeping up with the kitchen can be a struggle. That’s why many of our clients opt for weekly house cleaning services. While we handle the floors, dusting, and heavy scrubbing, it leaves you with the time and energy to maintain your precious kitchen tools like your wooden boards.
If you’re interested in seeing how we can help keep your entire home in "Ninja-level" shape, feel free to check out our services. We pride ourselves on using friendly, effective methods to keep your home a sanctuary.
Quick Tips for Daily Care:
- Wipe immediately: Don't let liquids sit on the wood.
- Soap is okay: Use a mild dish soap, but don't soak the board in the sink.
- Avoid the heat: Keep your board away from the stove or direct sunlight, which can cause the wood to dry out and crack prematurely.
Taking care of your wooden cutting board is a small act of kitchen "mindfulness" that pays off in the long run. Not only does it keep your food safe, but a well-maintained board can literally last a lifetime.
If you ever feel overwhelmed by the sheer volume of tasks it takes to keep a home running smoothly, remember that The Cleaning Ninjas Inc is always here to lend a hand. Whether you need a one-time deep clean or a regular bi weekly house cleaning schedule, we’ve got your back!
Happy chopping, and stay clean!

