

When you think about cleaning your kitchen, your mind probably jumps to the big stuff: scrubbing the stovetop, wiping down the counters, or finally tackling that mystery puddle at the bottom of the crisper drawer. But there is a silent, rubbery hero working 24/7 to keep your food fresh and your electric bill from skyrocketing: the refrigerator gasket.
At The Cleaning Ninjas Inc, we see a lot of fridges. While the shelves might be sparkling, that accordion-style rubber seal around the door is often the most neglected part of the appliance. Over time, it collects crumbs, spilled milk, and: if left too long: scary-looking black mold. A dirty gasket isn't just gross; it prevents your fridge from sealing properly. When cold air escapes, your fridge has to work double-time, which wears out the motor and drains your wallet.
In this edition of Ninja Tips, we’re diving deep into the art of refrigerator gasket cleaning. Grab your gear, and let’s seal in the cold.
The Ninja "Dollar Bill Test"
Before you start scrubbing, you need to know if your gasket is even doing its job. A gasket that is cracked, brittle, or warped might be beyond a simple cleaning. Here is a quick trick we use to check the seal’s integrity:
- Take a crisp dollar bill (or any piece of paper).
- Place it halfway inside the door and close the fridge.
- Try to pull the bill out.
If there is a slight resistance, your seal is still in good shape. If the bill slides out easily or falls to the floor, your gasket is either extremely dirty or needs to be replaced. If it’s just dirty, you’re in the right place. If it’s damaged, cleaning might help temporarily, but you’ll likely need a spare part soon.
Why Soap and Water Are Your Best Friends
You might be tempted to reach for a heavy-duty degreaser or a bleach-heavy bathroom cleaner to tackle those sticky spots. Stop right there! Most refrigerator gaskets are made of PVC or similar synthetic rubber materials. Harsh chemicals can actually dry out the rubber, causing it to crack and fail much faster than it should.
For 90% of gasket jobs, mild dish soap and warm water are all you need. It’s gentle enough to preserve the flexibility of the rubber but strong enough to break down the proteins and sugars found in food spills.
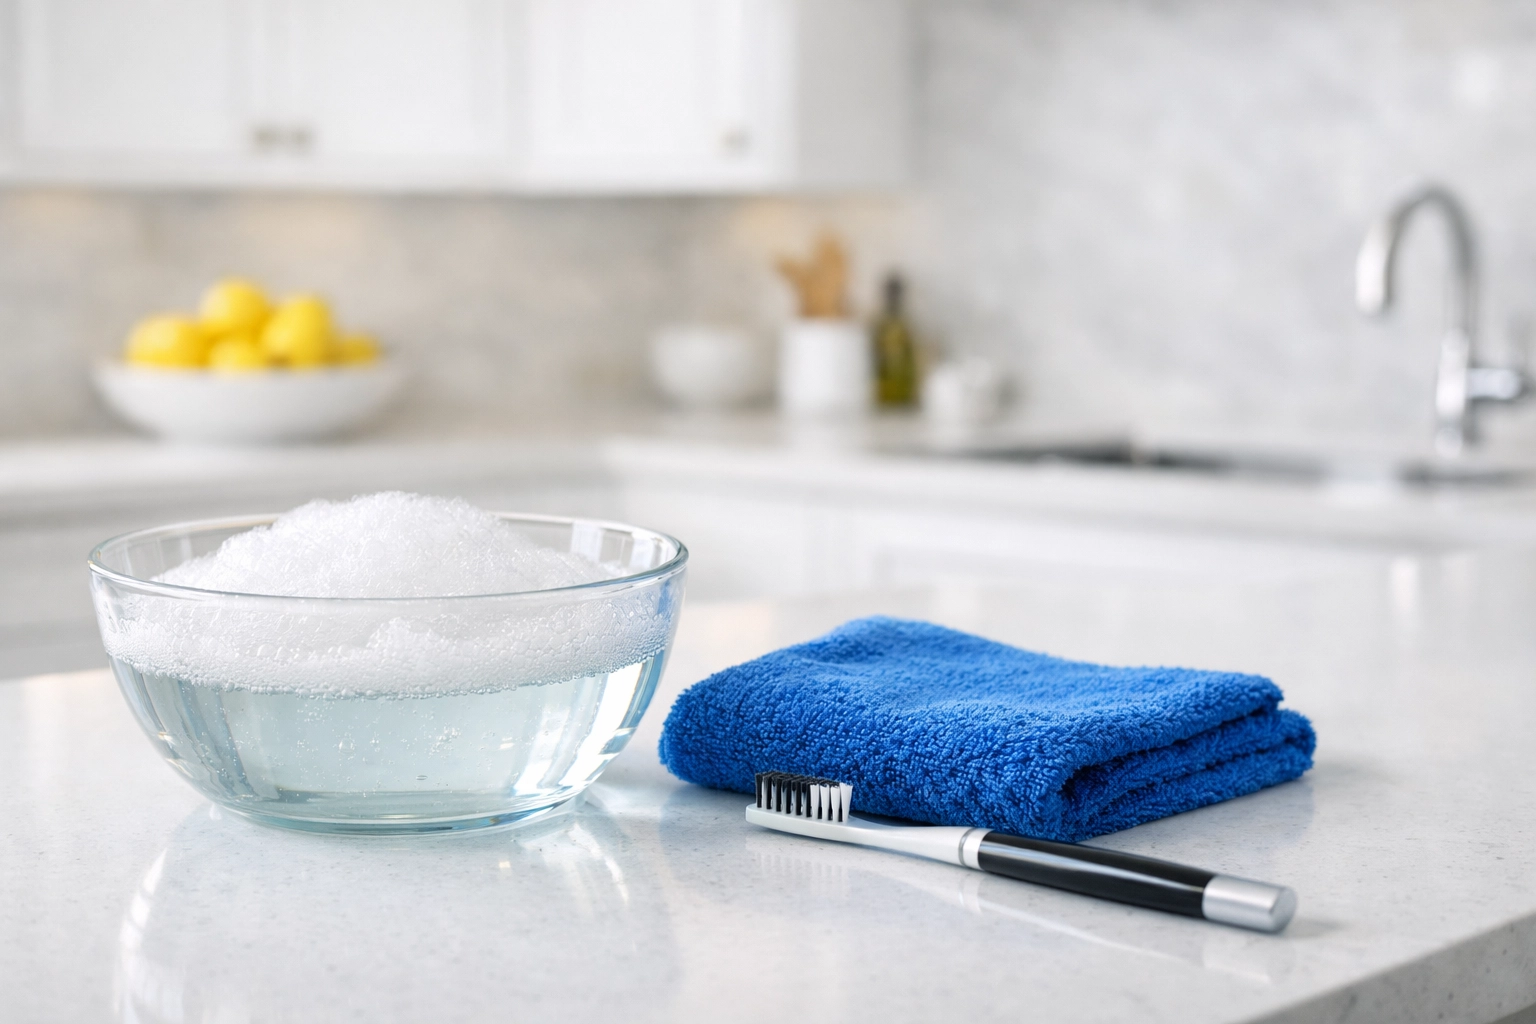
Your Ninja Cleaning Kit
To do this right, you don't need a fancy gadget. Just gather these basics:
- A small bucket or bowl of warm water.
- A few drops of mild dish soap (Dawn or similar works great).
- A microfiber cloth.
- An old, soft-bristled toothbrush (this is your secret weapon).
- White vinegar (for mold).
- Baking soda (for stubborn odors).
- Petroleum jelly (for the finishing touch).
Step-By-Step: The Deep Clean
1. The Initial Wipe-Down
Open your refrigerator door wide. Dip your microfiber cloth into the warm, soapy water and wring it out so it’s damp, not dripping. Start at the top of the door and work your way down. Wipe the flat surface of the gasket first to get the "easy" grime off.
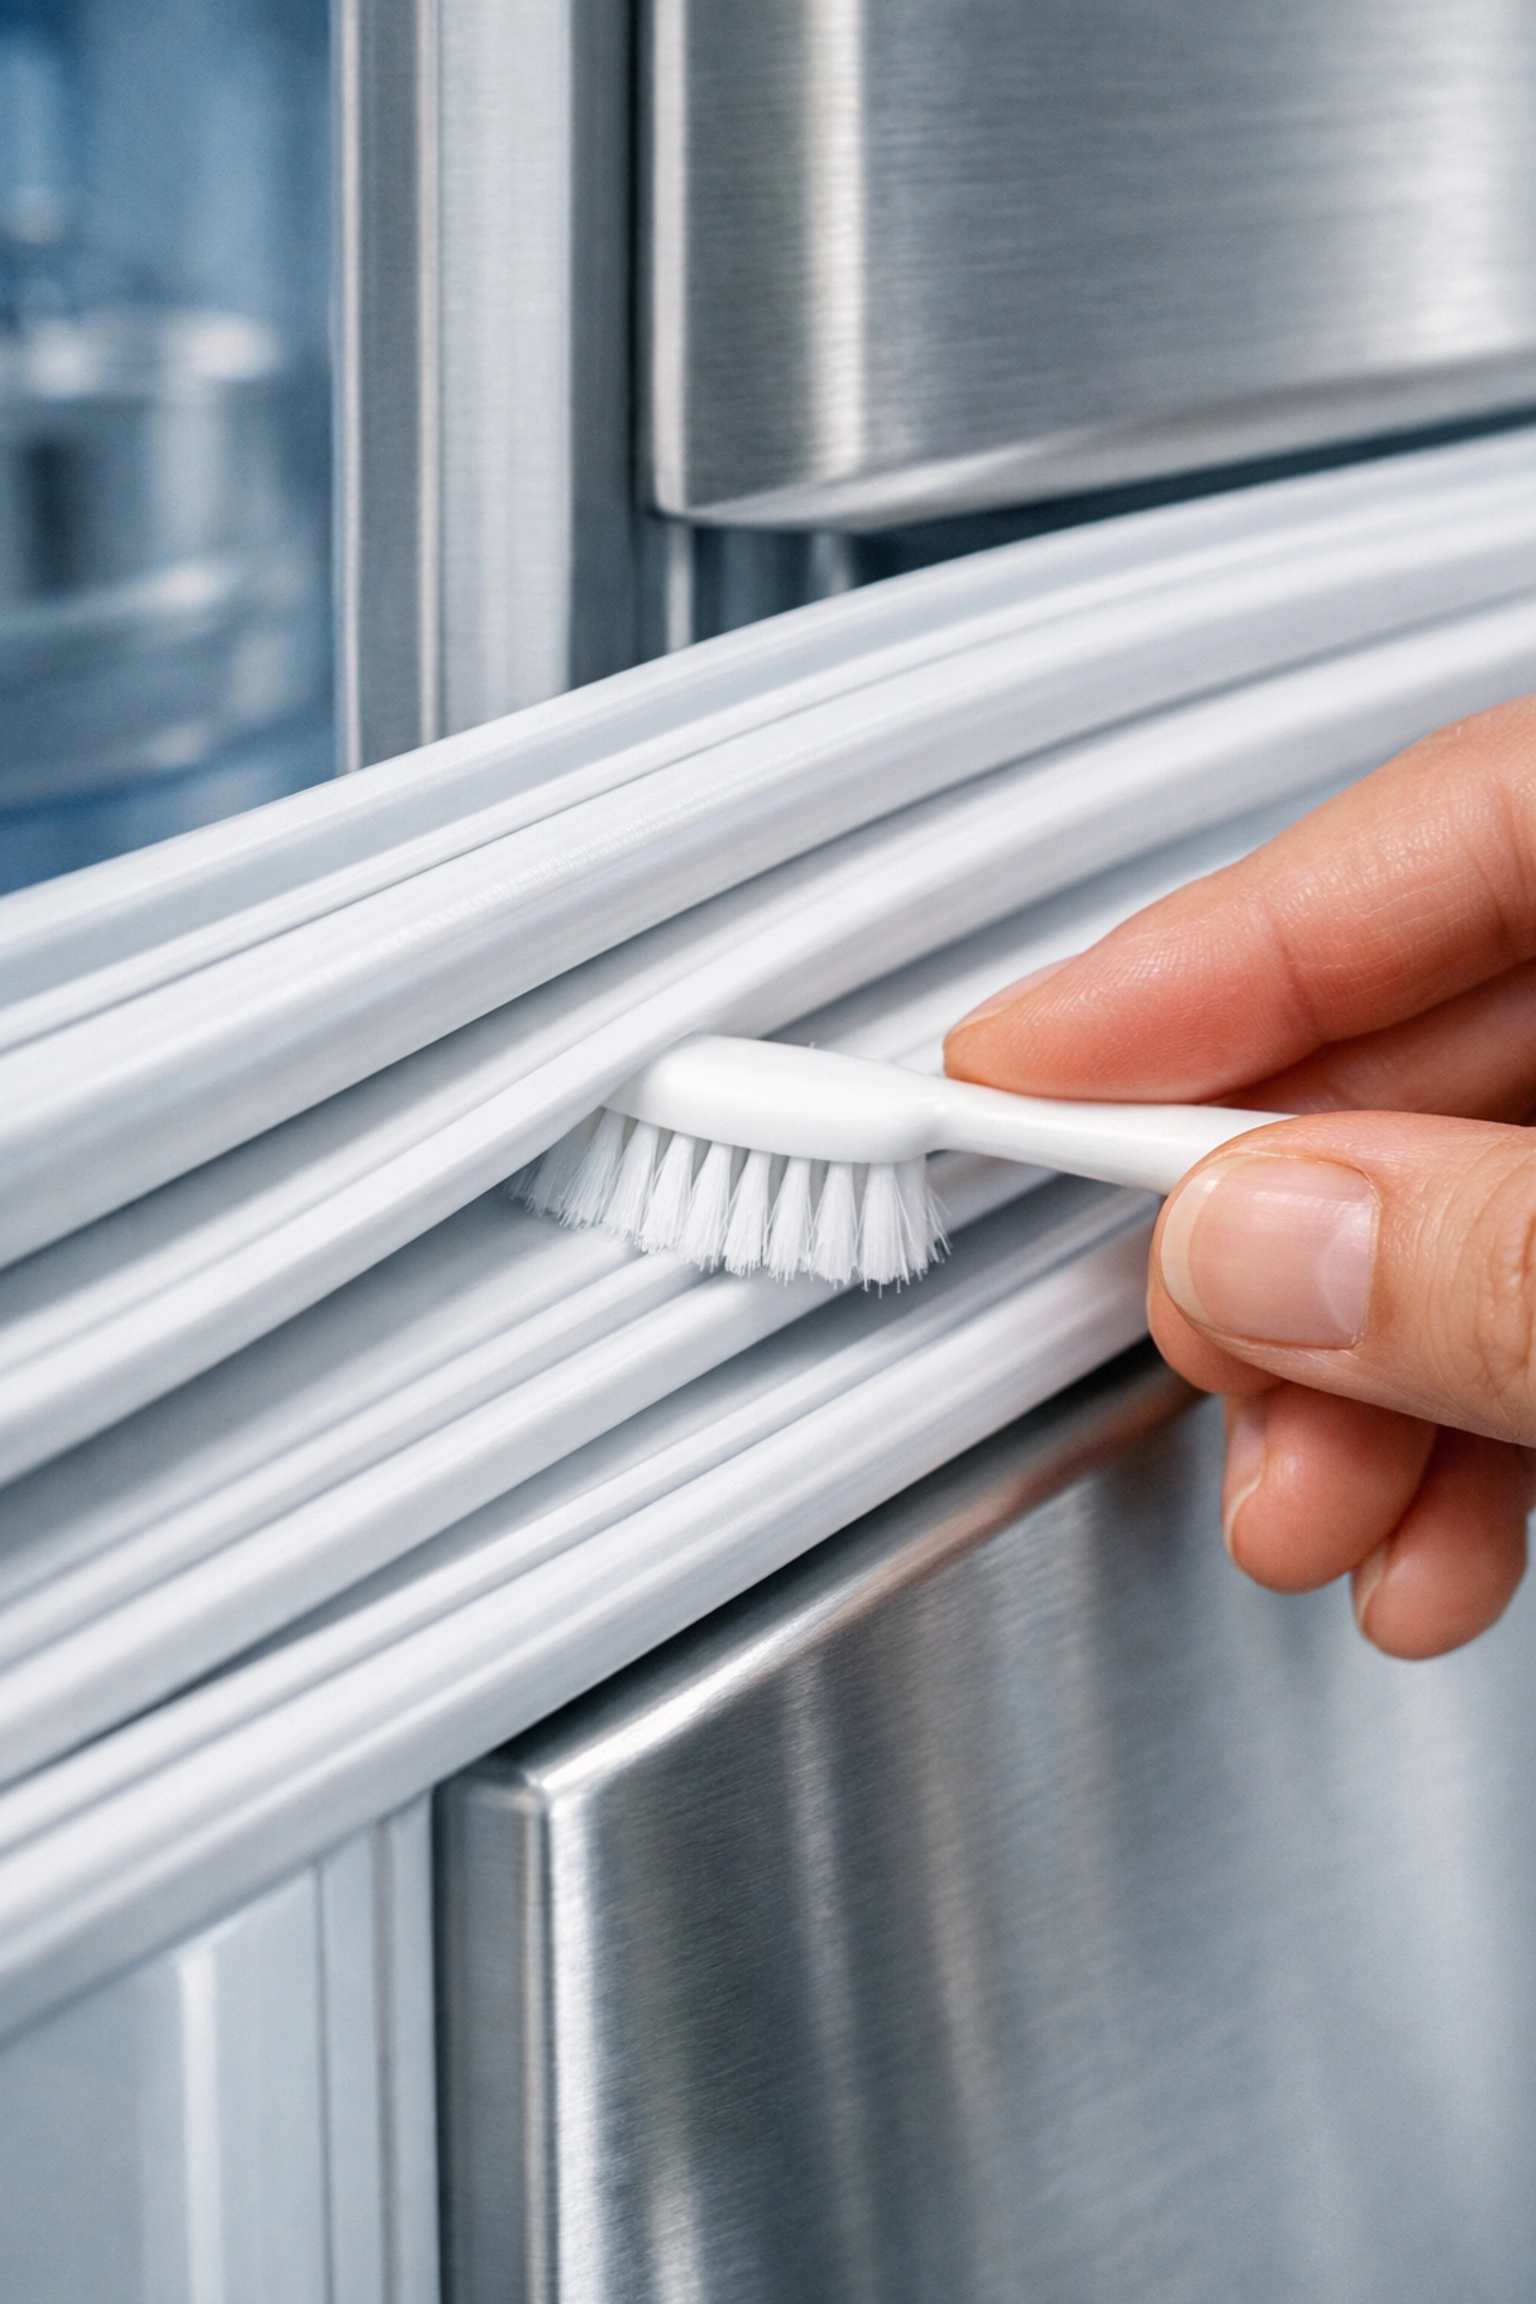
2. Enter the Toothbrush
This is where the real work happens. Refrigerator gaskets are designed with folds and crevices to create a suction seal. These "valleys" are magnet for crumbs and sticky residues. Dip your toothbrush into the soapy water and gently scrub inside every single fold.
Ninja Tip: Don't use a knife or a flathead screwdriver wrapped in a cloth to get into these gaps. It’s too easy to puncture the thin rubber, and once there’s a hole, the gasket is toast. Stick to the soft bristles of a toothbrush.
3. Tackling Mold and Mildew
If you see black spots, that’s usually mold triggered by moisture and food particles. Soap might not kill the spores. In this case, mix a solution of one part white vinegar to two parts water.
Vinegar is a natural disinfectant that is safe for the gasket. Dip your toothbrush in the vinegar mix and scrub the affected areas. Let it sit for about 30 seconds to work its magic before wiping it away with a clean, damp cloth. For more heavy-duty advice on keeping your home healthy, check out our other cleaning tips.
4. The Baking Soda Paste (For the Tough Stuff)
If you’ve got a spill that has basically turned into superglue, make a paste of baking soda and a tiny bit of warm water. Apply it to the sticky spot, let it sit for five minutes, and then scrub gently. The baking soda provides a very mild abrasive action that lifts the gunk without scratching the PVC.
The Drying Phase: Don't Skip This!
One of the biggest mistakes people make is closing the door while the gasket is still wet. Moisture trapped in the folds is the #1 cause of mold regrowth. Use a dry microfiber cloth or even a paper towel to get deep into the folds and dry them completely.
If you want to be extra thorough, you can even use a hairdryer on a cool or low-heat setting to ensure every drop of moisture is gone. Just be careful not to use high heat, as you don't want to melt or warp the rubber.
The Secret Weapon: Petroleum Jelly
Once your gasket is clean and bone-dry, it’s time for the "Ninja Polish." Take a tiny amount of petroleum jelly (Vaseline) on your fingertip and rub a very thin layer along the surface of the gasket where it meets the fridge frame.
This does two things:
- It keeps the rubber supple and prevents it from drying out or cracking.
- It helps create a more airtight seal, improving the efficiency of your refrigerator.
You only need a tiny bit: if it’s goopy, you’ve used too much. It should just look slightly shiny.
Troubleshooting a Warped Gasket
Sometimes, even after a good cleaning, you might notice a gap where the door doesn't quite meet the fridge. This often happens if the gasket has been squashed or stayed in one position for too long.
The Hairdryer Trick:
Gently heat the warped section of the gasket with a hairdryer on a medium setting. As the rubber warms up, it becomes more pliable. You can then use your fingers to gently pull and reshape the gasket back to its original form. Hold it in place for a moment as it cools, and it should "remember" its new, better shape.

How Often Should You Do This?
In a perfect world, you’d give the gasket a quick wipe-down once a month. However, we know life gets busy! At the very least, aim for a deep clean every three months. If you have kids who tend to leave "sticky fingers" all over the fridge, you might need to check it more often.
Keeping the gasket clean is a small task that pays off in a big way. It keeps your food safer by maintaining a consistent temperature and prevents those annoying "Why is the fridge humming so loud?" moments.
When to Call in the Pros
We get it: between work, family, and trying to have a life, cleaning the tiny folds of a refrigerator seal isn't always at the top of your Saturday to-do list. That’s where we come in.
At The Cleaning Ninjas Inc, we pride ourselves on catching the details that others miss. Whether it’s a one-time deep clean or a recurring service to keep your home in "Ninja-ready" condition, we’ve got you covered. You can learn more about what we do on our About Us page or explore our full range of professional services.
A clean home is a happy home, and a clean fridge seal is a happy electric bill. Keep those gaskets tight, and stay tuned for more Ninja Tips to keep your space sparkling! For more deep dives into home maintenance, feel free to browse our full blog.


