

Let’s be honest for a second: when was the last time you actually looked inside your keyboard? Not just at the keys, but in those tiny, dark crevices between them? If you’re like most of us, your keyboard is a silent witness to your daily life. It’s seen the crumbs from that "quick desk lunch," the dust bunnies of three different seasons, and maybe even a splash or two of morning coffee.
At The Cleaning Ninjas Inc, we talk a lot about sparkling floors and dust-free shelves, but there is one area that often gets ignored until a key starts sticking: your workstation. Your keyboard is one of the highest-touch surfaces in your entire home or office. In fact, some studies suggest that the average office keyboard can harbor more bacteria than a toilet seat. Gross, right?
But don't panic! You don't need a degree in microbiology to fix this. Evicting those crumbs and germs is a simple process that takes about ten minutes once you have the right "Ninja" tools. Let’s dive into how you can give your keyboard a fresh start.
Why Your Keyboard is a Germ Magnet
Before we get into the "how," let’s talk about the "why." Why does it get so bad? Unlike a countertop that you can wipe down in one swift motion, keyboards are full of nooks, crannies, and moving parts. This design makes them the perfect trap for:
- Skin Cells: We shed thousands of skin cells every minute. Many of these land right on your keys.
- Oil and Sweat: Your fingertips naturally produce oils, which act like a glue for dust and dirt.
- Food Particles: Even if you aren't eating a full meal, those tiny crumbs from a granola bar or a cracker find their way into the depths of the switches.
- Airborne Dust: Dust settles everywhere, and the static electricity generated by electronics can actually pull dust toward the device.
When these things combine, they create a "biofilm": a thin, invisible layer of grime that bacteria love. Beyond the "yuck" factor, this buildup can actually damage your hardware. Crumbs can prevent keys from registering, and moisture from spills (or even just heavy humidity mixed with dust) can cause corrosion over time.
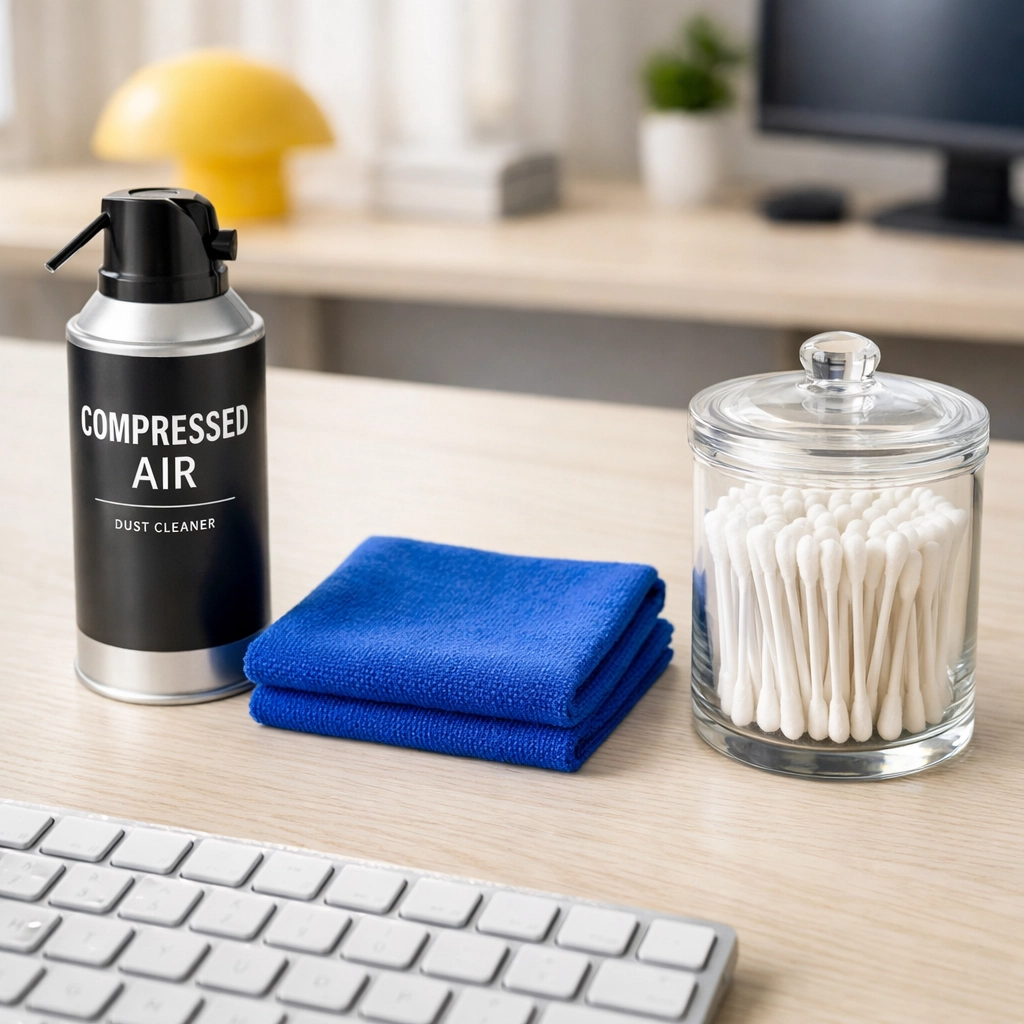
The Ninja Tool Kit: What You’ll Need
You don’t need industrial chemicals to clean a keyboard. In fact, harsh chemicals can actually melt the plastic or rub the letters right off your keys. Here is the simple kit we recommend:
- Compressed Air: This is your primary weapon for the "eviction" phase.
- Microfiber Cloths: These are essential because they pick up debris rather than just pushing it around.
- 70% Isopropyl Alcohol: This is the gold standard for disinfecting electronics. It evaporates quickly and kills most common germs.
- Cotton Swabs (Q-tips): Perfect for detailing those tight spaces.
- Keyboard Cleaning Gel (Optional): Also known as "cleaning slime," this is great for picking up stubborn hair and dust.
- A Small Brush: An old (clean) toothbrush or a dedicated keyboard brush works wonders.
Step 1: The Safety First Protocol
Before you do anything, unplug your keyboard. If you’re using a laptop, shut it down completely and unplug the power cord. If it’s a wireless keyboard, remove the batteries or turn it off.
We’ve heard horror stories of people trying to "surface clean" their keyboard while it’s still on, only to accidentally delete a massive spreadsheet or send a gibberish email to their boss. Plus, using liquids (even alcohol) around live electronics is never a great idea. Safety first, always!
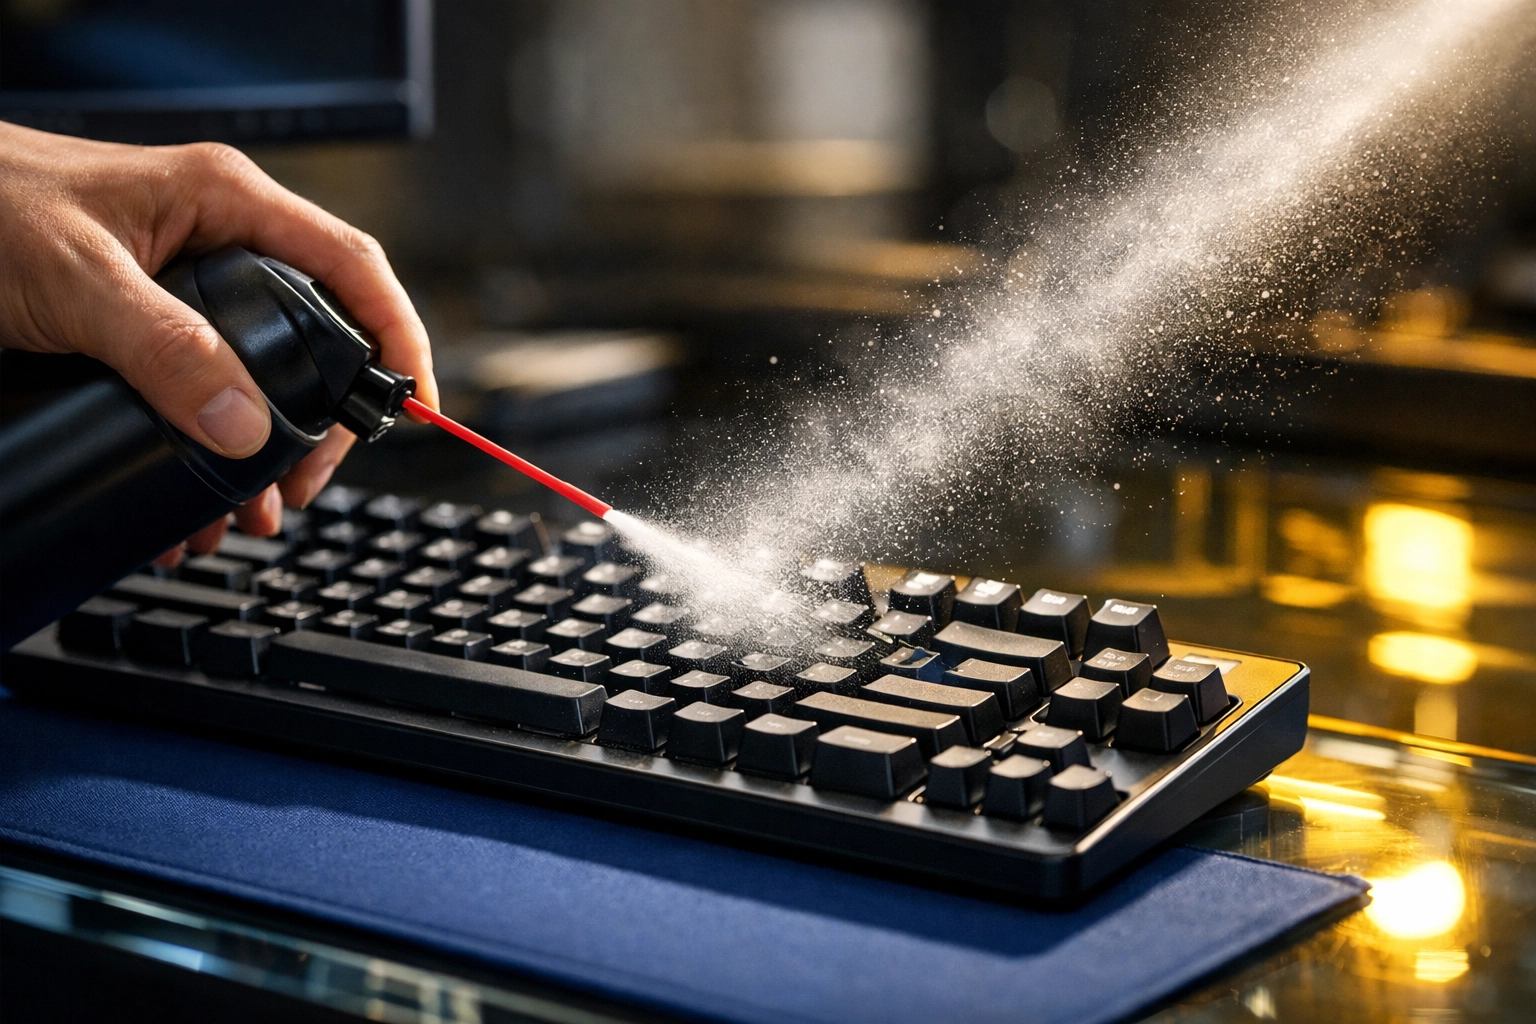
Step 2: The Great Crumb Eviction (The Shake and Spray)
Now that the power is off, it’s time to get rid of the heavy hitters: the crumbs.
Start by taking your keyboard over to a trash can. Flip it completely upside down and give it a few gentle taps on the back. You’ll be surprised (and maybe a little horrified) at what falls out. Give it a good shake from side to side to loosen up anything caught under the larger keys like the Space Bar or Shift key.
Next, bring in the compressed air. This is where most people make a mistake. Do not tilt the can. If you tilt a can of compressed air, it can spray liquid propellant, which is freezing cold and can potentially damage your keyboard's internal components.
Hold the keyboard at an angle (about 75 degrees) and spray in short, controlled bursts. Move in a zigzag pattern from one side to the other. This ensures that the air is pushing the dust out rather than just blowing it deeper into the casing.
Step 3: Dealing with the Sticky Stuff (The Microfiber Magic)
Once the loose debris is gone, you’re left with the "film" we mentioned earlier. This is the oily residue from your fingers.
Take your microfiber cloth and dampen it slightly with the isopropyl alcohol. A key word here is damp, not dripping. You should never pour any liquid directly onto your keyboard.
Wipe down every key individually. If you have a particularly stubborn stain (maybe a drop of dried soda), let the damp cloth sit on that spot for a few seconds to soften it before wiping. Microfiber is great because it’s soft enough not to scratch the finish but "grippy" enough to lift away oils.
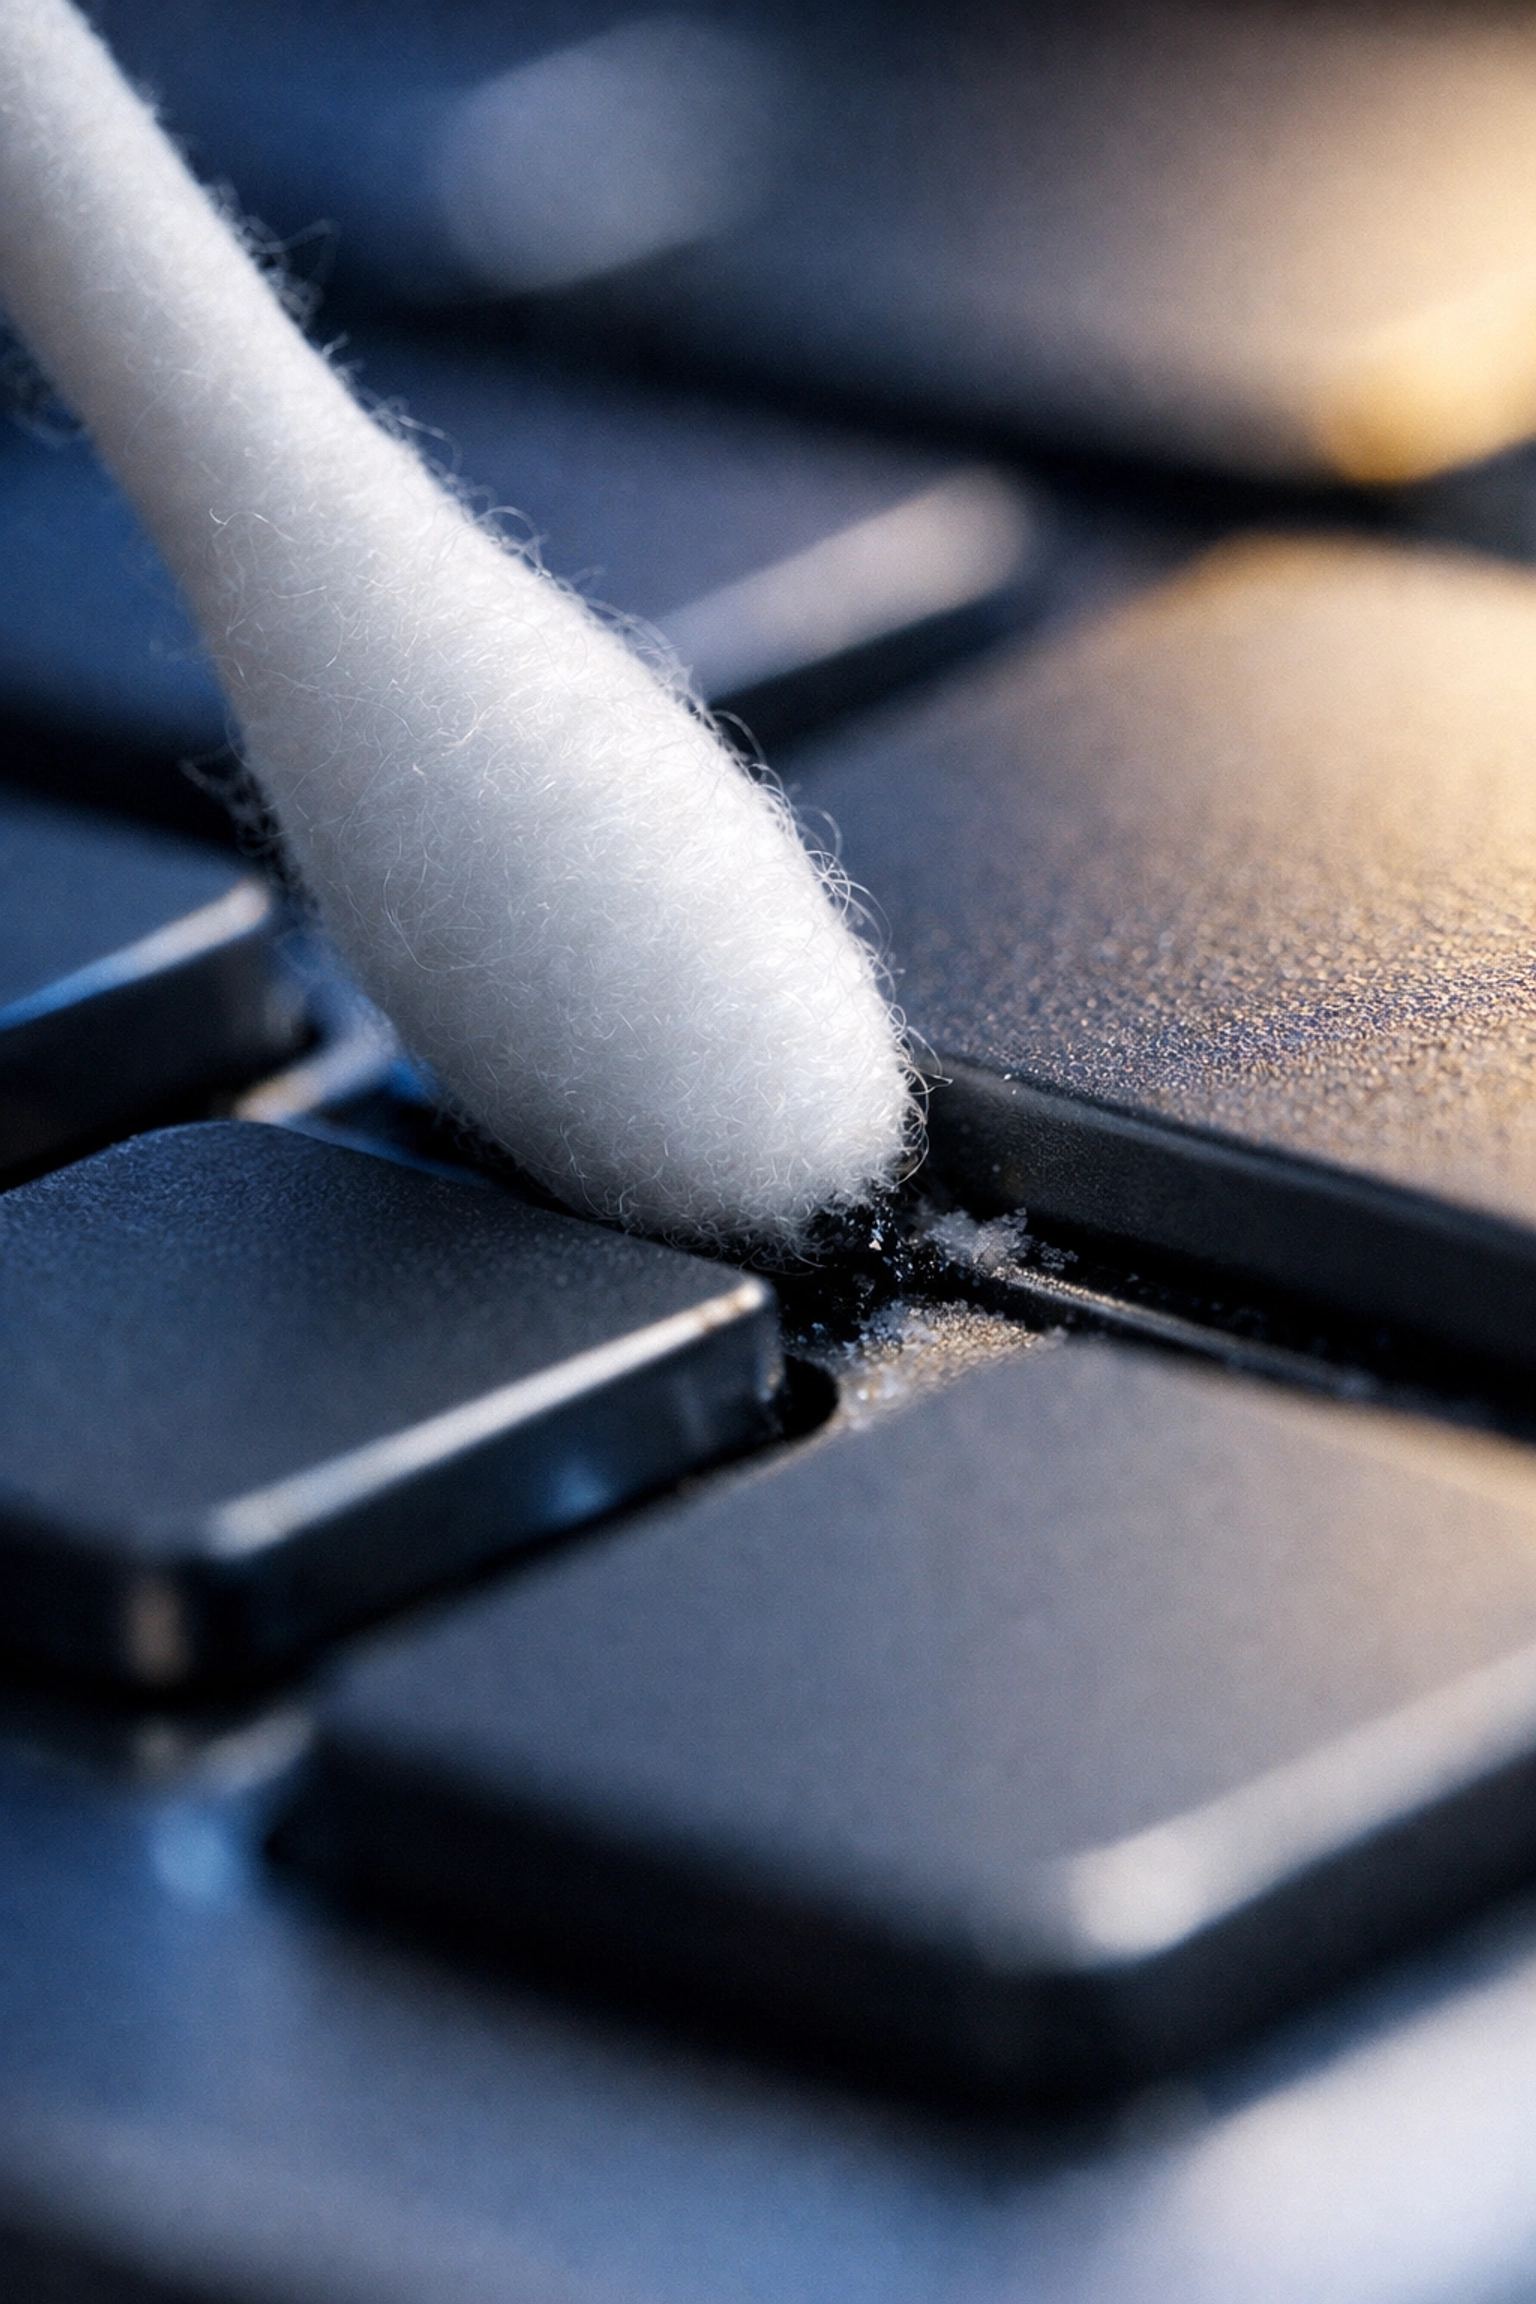
Step 4: Detailing with Cotton Swabs
Even the best cloth can’t reach the sides of the keys or the very bottom of the "well" where the key meets the board. This is where the cotton swabs come in.
Dip a swab in the alcohol and run it along the edges of every key. This is the most time-consuming part of the process, but it’s also the most satisfying. You’ll see the swab turn grey or black as it picks up the hidden grime.
Ninja Tip: Don't forget the very edges of the keyboard and the underside! We often touch the edges to reposition the board, transferring oils there too.
Step 5: The "Slime" Solution (Optional)
If you find that there’s still cat hair or fine dust stuck in places the air couldn't reach, keyboard cleaning gel is your best friend. It looks like the "Gak" or "Slime" kids play with, but it’s designed to be slightly tacky.
You simply press it onto the keys and let it sink into the gaps for a second or two, then pull it back. It molds to the shape of the keyboard and pulls out everything in its path. Just make sure not to leave it on for too long, or it might get too deep into the switches!
Deep Cleaning: For the Mechanical Keyboard Enthusiasts
If you use a mechanical keyboard, you likely have a "keycap puller." These keyboards are designed to be taken apart. If things are really bad, you can pop off every single keycap and soak them in a bowl of warm water with a drop of dish soap.
While the caps are soaking, you can use your brush and compressed air to clean the exposed "plate" of the keyboard. This is the only way to get a 100% clean board. Just make sure those keycaps are completely dry (we recommend letting them sit for 24 hours) before you snap them back on. Moisture trapped inside a keycap is a recipe for a dead keyboard.
Maintaining Your Digital Sanctuary
Now that your keyboard is pristine, how do you keep it that way? We know you're busy, and you're not going to deep clean your tech every single day. Here are a few "Ninja" habits to help:
- The "No-Food" Zone: It’s tough, but keeping snacks away from the computer is the number one way to prevent buildup.
- Wash Your Hands: A quick hand wash before a long gaming session or a work marathon prevents those oils from building up as fast.
- Weekly Wipe-Down: Keep a small microfiber cloth and a bottle of alcohol near your desk. A 30-second wipe-down every Friday afternoon will prevent the need for a major deep clean later.
- Cover It Up: If you’re going to be away for a few days, consider throwing a clean towel or a dedicated keyboard cover over it to prevent dust from settling.
When to Call in the Pros
While we love a good DIY cleaning project, we also know that life gets in the way. Sometimes, the "to-do" list gets so long that the keyboard germs are the least of your worries.
If you’re feeling overwhelmed by the state of your home or office, we’re here to help. While we might not come over just to clean your Shift key, we can certainly handle the rest of the environment so you have more time to focus on what matters. You can check out our services to see how we can take the stress of cleaning off your plate.
At The Cleaning Ninjas Inc, we believe a clean environment leads to a clear mind. Whether it's the air you breathe or the keys you touch, every detail matters. If you want to learn more about the team behind the masks, feel free to visit our About Us page!
Final Thoughts
Cleaning your keyboard isn't just about aesthetics; it's about health and longevity. Those crumbs aren't just annoying; they're a playground for germs. By spending just a few minutes every few weeks with some compressed air and a microfiber cloth, you can make your workspace a much more pleasant place to be.
So, go ahead: unplug that keyboard, give it a shake, and show those crumbs who’s boss. Your fingers (and your health) will thank you! For more tips on keeping every corner of your life clean, stay tuned to our blog. Happy cleaning!


