

You’ve finally done it. The renovation is over. The contractors have packed up their saws, the smell of fresh paint is in the air, and you’re ready to finally enjoy your space. It looks perfect: until you catch a glimpse of a stray sunbeam and realize there’s a thin, ghostly layer of white powder coating every single surface.
Welcome to the post-construction life.
At The Cleaning Ninjas Inc, we see this every day. You think the "rough clean" the construction crew did was enough, but construction dust is a different beast entirely. It’s microscopic, it’s invasive, and it has a weird way of defying gravity. One of the biggest culprits of lingering "new house" sneezing fits? The hidden tops of your door frames.
In this guide, we’re going to show you why these spots are the ultimate hiding place for fine dust and how to clean them like a true ninja.
The Mystery of the Floating Dust
If you’ve ever wondered why your house still feels "dusty" a week after a remodel, look up. Most people focus their cleaning efforts on the floors and the countertops because that’s what we see. But construction dust (mostly made of drywall particles, sawdust, and silica) is incredibly light. When workers are sanding or cutting, that dust stays suspended in the air for hours, slowly drifting downward.
Where does it land? On every horizontal surface it can find. While you’ve likely wiped down your tables and shelves, the very top edge of your door molding: the part that faces the ceiling: is a perfect, flat shelf that rarely gets touched.
If you leave that dust up there, every time you swing the door open or closed, you’re creating a small gust of wind that knocks those particles back into the air you’re breathing. It’s a never-ending cycle unless you tackle the source.
The Ninja Toolkit: What You Need
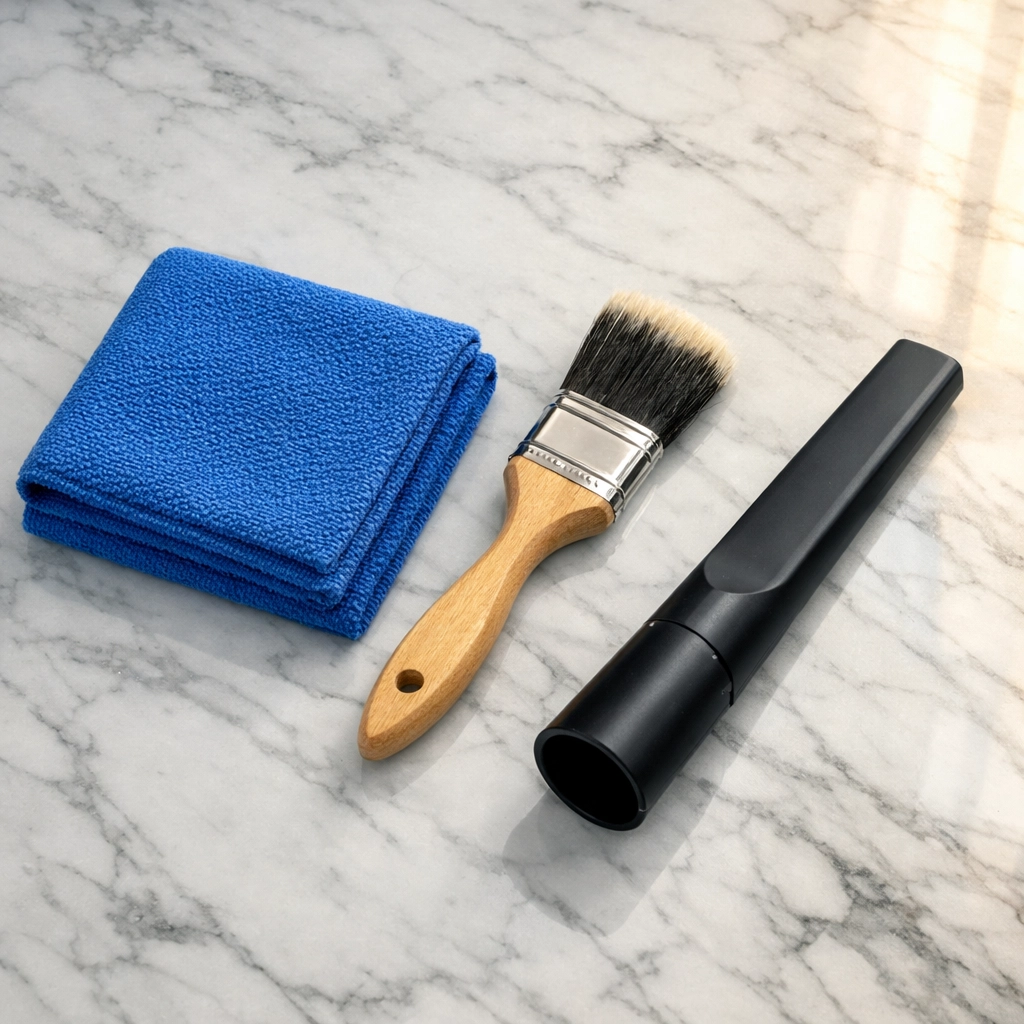
Before you climb a ladder, you need the right gear. Using a dry rag or a feather duster won't cut it here; you’ll just end up pushing the dust off the ledge and onto your head (or your freshly mopped floors).
Here is what we suggest for a proper post-construction cleaning:
- A Sturdy Step Ladder: Safety first! Don’t try to balance on a rolling office chair.
- A HEPA-Filter Vacuum: This is non-negotiable for construction dust. Standard vacuums often exhaust fine particles back out into the room. A HEPA filter traps 99.97% of those tiny irritants.
- Microfiber Cloths: These are engineered to grab and hold onto dust rather than just spreading it around.
- A Clean Paintbrush: A 1-inch or 2-inch synthetic brush is a secret weapon for getting into the decorative grooves of molding.
- A Mild Cleaning Solution: One tablespoon of dish soap in a gallon of warm water works wonders.
Step 1: The Preliminary "Ninja Strike" (Vacuuming)
The goal of post-construction cleaning is to remove as much dry material as possible before you ever introduce moisture. If you start with a wet cloth on a pile of drywall dust, you’ll just create a sticky, white paste that’s a nightmare to clean out of the wood grain.
Climb your ladder so you can see the top of the frame clearly. Using the nozzle attachment on your vacuum, slowly run it along the top edge. Don't press too hard: you don't want to scratch the new paint: just let the suction do the work. This should remove about 80% of the bulk material.
Step 2: Detailing the Grooves
If you have ornate molding or "craftsman-style" door frames, there are likely little nooks and crannies where a vacuum nozzle can't reach. This is where your clean paintbrush comes in. Use the brush to flick the dust out of the corners while holding the vacuum hose right next to it to catch the debris as it falls. This attention to detail is what separates a DIY job from a professional Ninja clean.
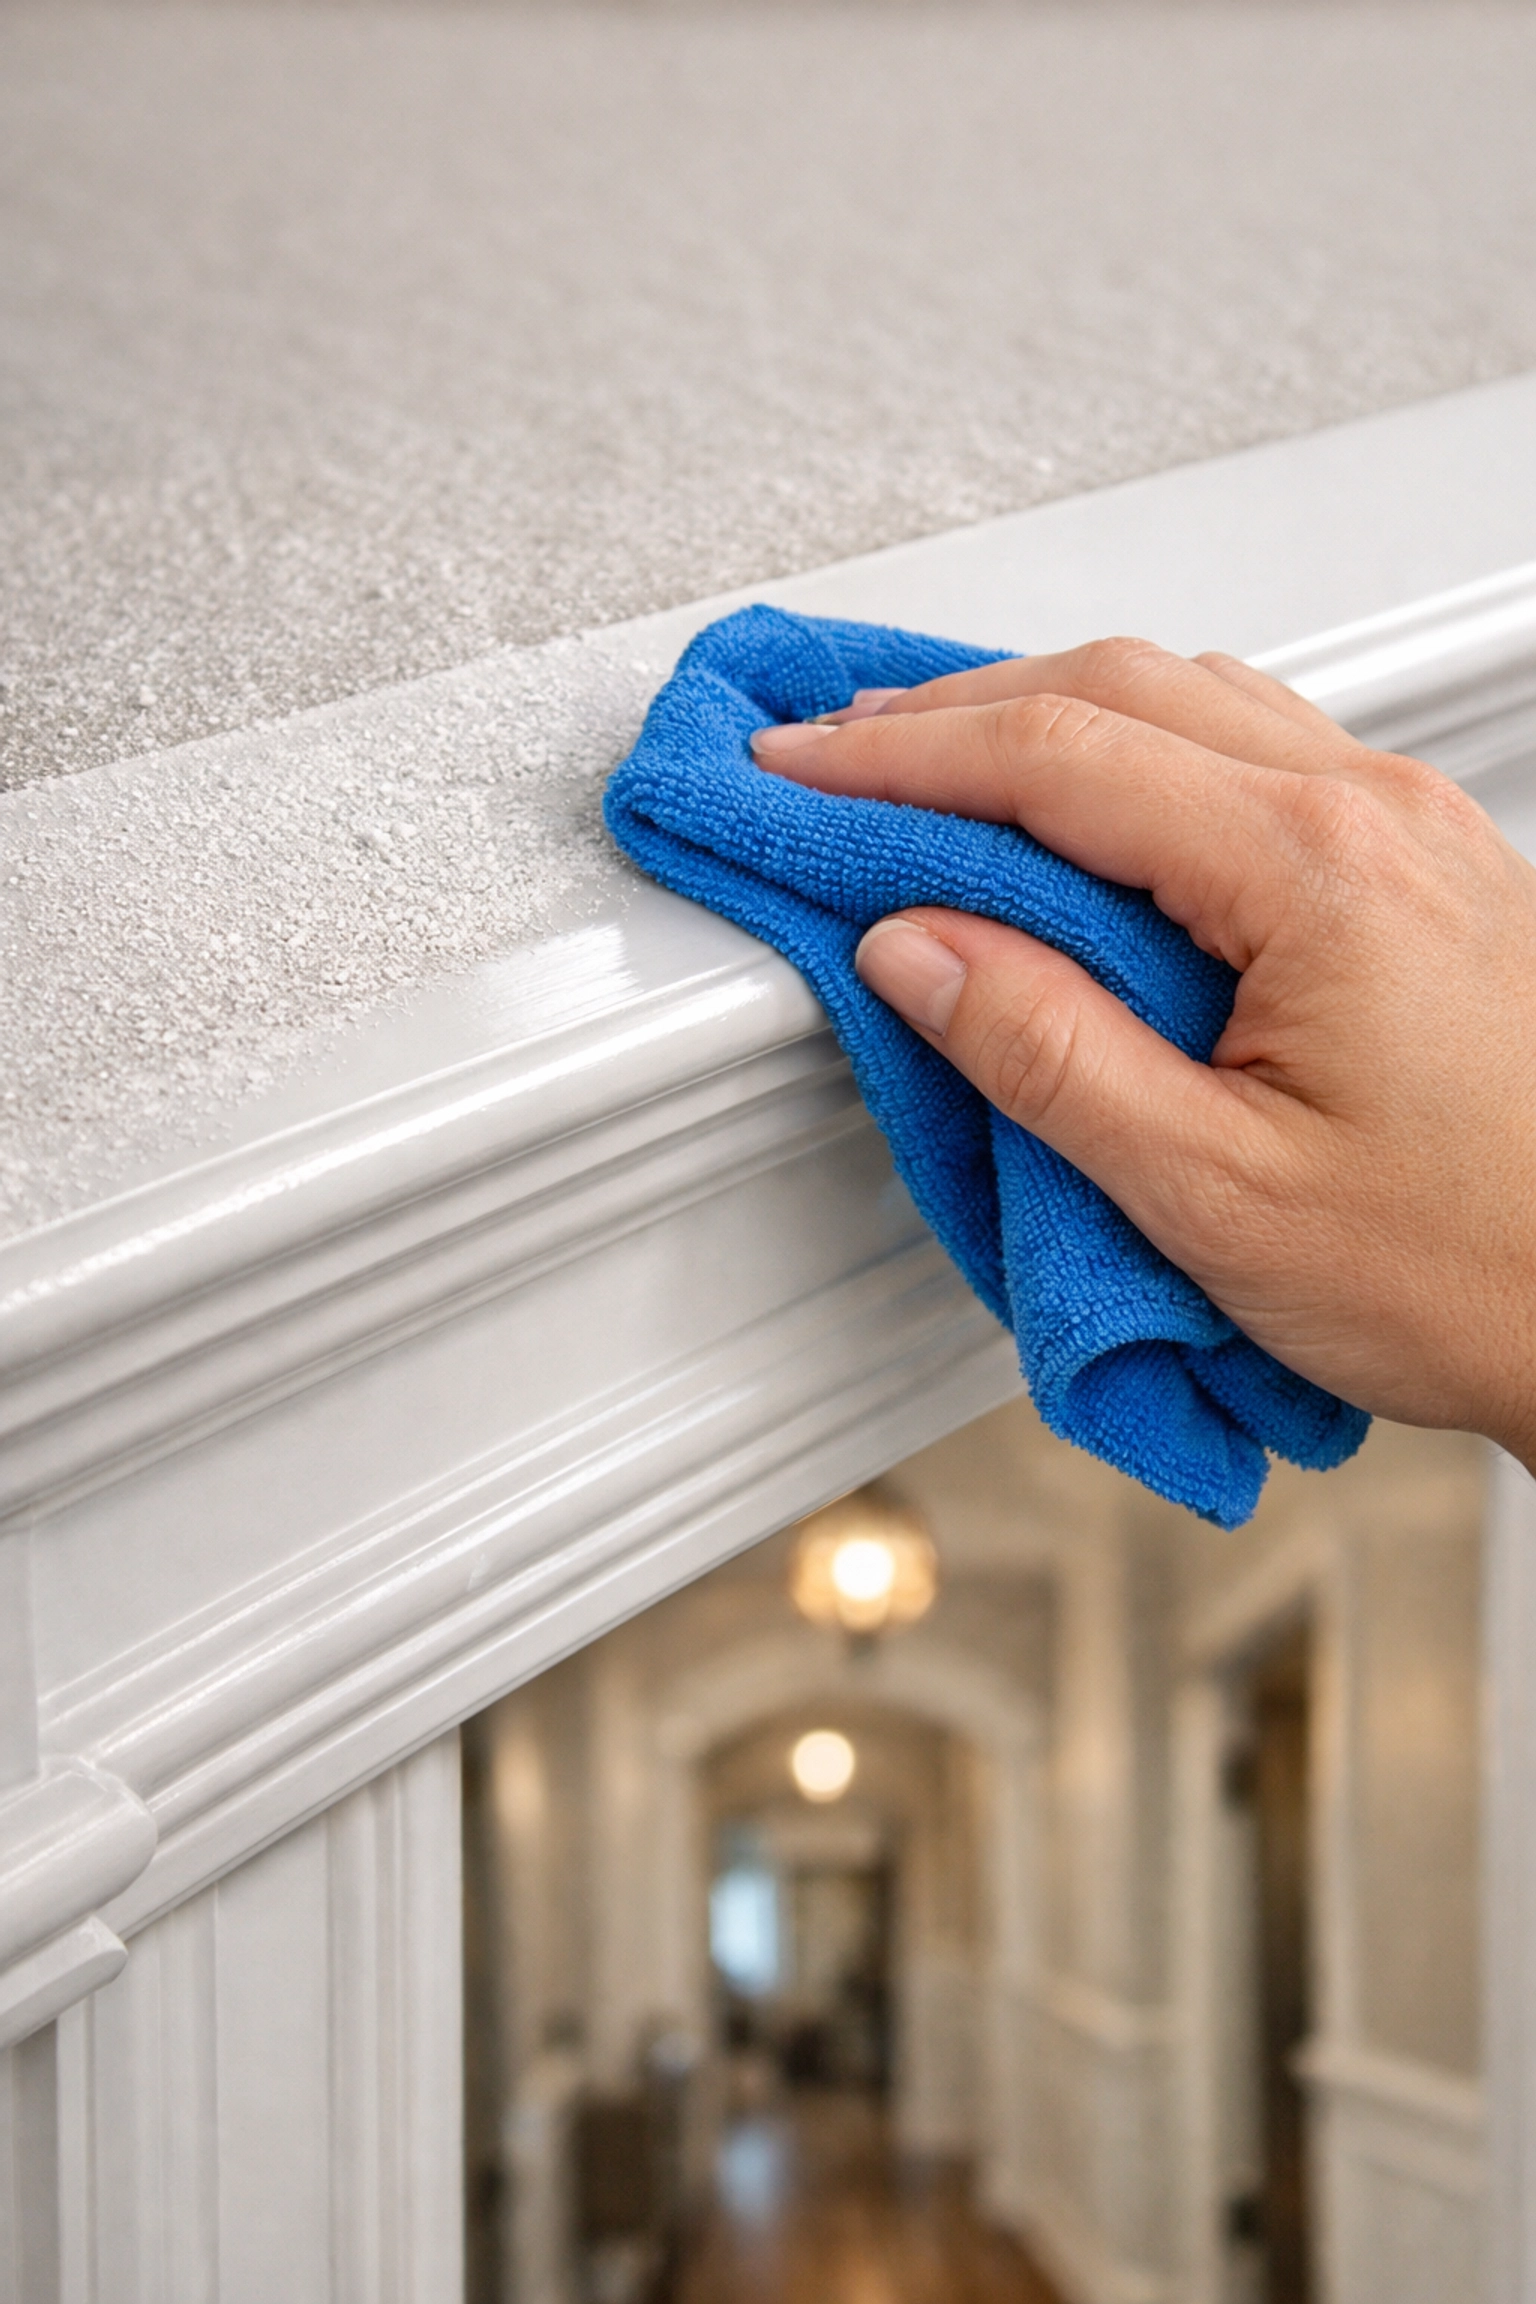
Step 3: The Damp Wipe
Once the dry dust is gone, it’s time to tackle the "ghosting": that thin film that stays behind. Dampen a microfiber cloth in your soapy water solution. Wring it out until it is barely damp; you never want to soak wood or MDF molding, as it can cause swelling.
Wipe the top surface in one long, continuous motion. Fold the cloth to a clean side and repeat. If the cloth comes back white or grey, keep going until it stays clean.
Step 4: Don't Forget the Vertical Edges
While you’re up there, take a look at the side of the door frame where the horizontal piece meets the vertical ones. Dust often collects in that "joint." Wipe down the sides of the frames as well, working from the top all the way down to the baseboards.
Why Attention to Detail Matters
At The Cleaning Ninjas Inc, we believe that the difference between a house and a home is how it feels. If you’re constantly cleaning but the air still feels "heavy," it’s usually because of these hidden spots. When we perform our post-construction cleaning services, we don't just look at what’s at eye level. We look up, we look under, and we look behind.
Contractors are great at building things, but they aren't cleaners. Their job is to get the project done and "broom clean" the area. That means the tops of door frames, the insides of light fixtures, and the tops of kitchen cabinets are almost always overlooked.
Other Hidden Spots to Check
Since you already have the ladder out, here are a few other places where fine construction dust likes to hide:
- The Tops of Window Casings: Just like door frames, these are magnets for drywall dust.
- Cabinet Tops: If your kitchen cabinets don't go all the way to the ceiling, there is a massive amount of dust sitting up there.
- Door Hinges: Construction dust loves to settle into the grease of the hinges. It looks like a grey sludge over time if not cleaned.
- Light Bulbs: Dust on a light bulb can actually create a "burnt" smell when the light is turned on.

The Health Benefit of a Deep Clean
It’s not just about aesthetics. Construction dust can contain silica, lead (in older home renovations), and volatile organic compounds (VOCs). Leaving this dust on your door frames means it will circulate through your HVAC system every time the air turns on. For families with asthma or allergies, this can be a major health trigger.
Taking the time to clean these hidden "dust shelves" ensures that your new renovation is a healthy environment for your family. If the task feels overwhelming: and after a long renovation, it usually does: that’s where we come in.
Let the Ninjas Handle the Fine Print
Post-construction cleaning is an exhausting, multi-step process. Most homes require at least two or three "passes" to fully eliminate the dust that settles after the initial clean. If you'd rather spend your time decorating your new space instead of climbing ladders with a vacuum, give us a call.
We pride ourselves on our friendly, meticulous approach. We treat every home like it’s our own, ensuring that every door frame, baseboard, and hidden nook is spotless. You can learn more about our team and our philosophy on our About Us page.
Final Thoughts for the DIY-er
If you’re tackling this yourself, remember to be patient. You might clean the top of a door frame today and find a light dusting there again tomorrow. That’s normal! Dust takes time to settle out of the air. Just keep your microfiber cloths handy and remember to work from the top of the room down to the bottom.
Cleaning the hidden tops of door frames might seem like a small thing, but it’s the secret to a truly clean, fresh-smelling home. It’s that extra 10% of effort that makes your renovation finally feel finished.
Happy cleaning, and enjoy your beautiful new space! If you need a hand getting it to that "Ninja-level" of clean, you know where to find us. Check out our Cleaning Tips for more advice on keeping your home in tip-top shape.


