

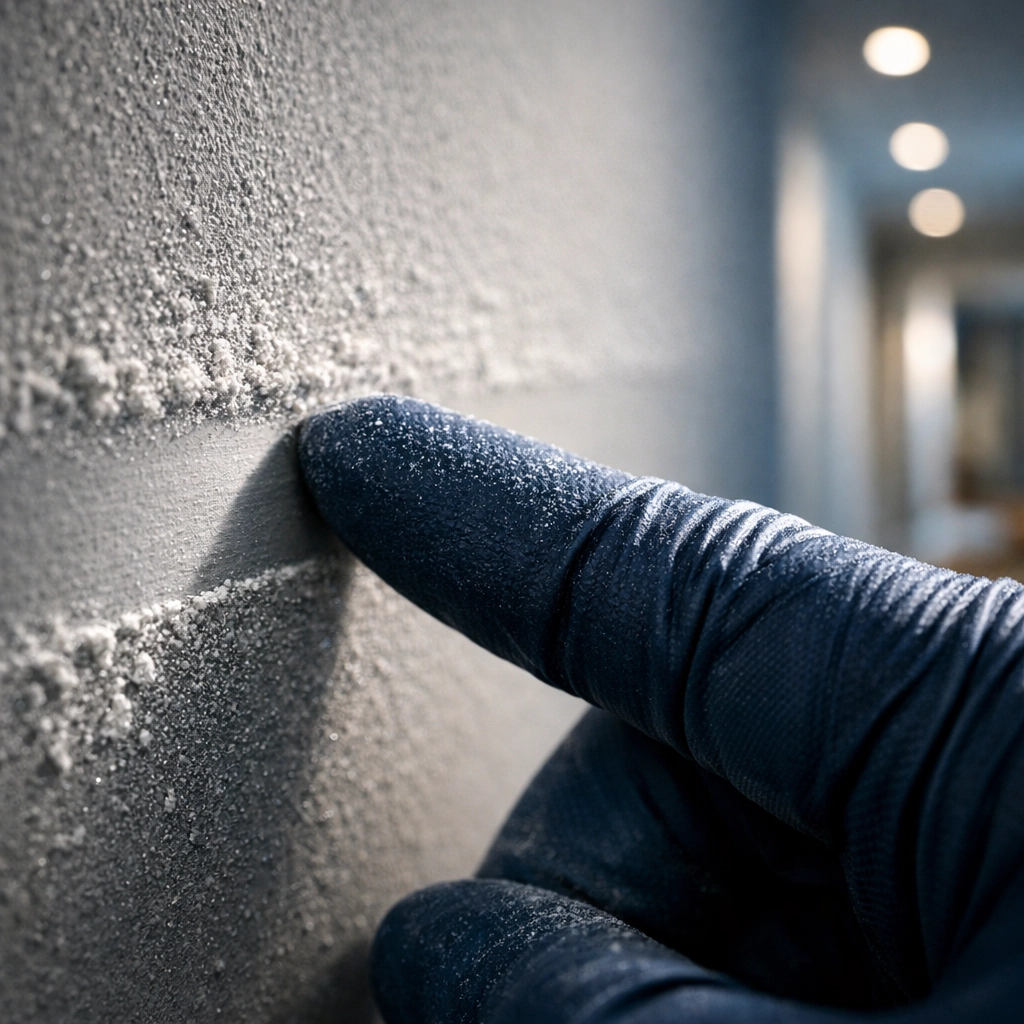
You’ve finally done it. The renovation is finished, the contractors have packed up their tools, and your home looks like something straight out of a magazine. But as you’re admiring the new crown molding or that fresh coat of "Cloud White" paint, you notice a weird, chalky film on everything. You swipe a finger across the wall, and your tip comes back coated in a fine, ghostly powder.
Welcome to the aftermath of construction: drywall dust.
At The Cleaning Ninjas Inc, we see this all the time. Drywall dust is the ultimate party crasher. It’s microscopic, it’s invasive, and if you don’t handle it correctly, you’ll just end up moving it from one spot to another: or worse, turning it into a smeary, muddy mess on your brand-new walls.
Cleaning up after a project is a marathon, not a sprint. If you’re ready to reclaim your home from the "dust-pocalypse," here is our ninja-approved guide to spotting and safely removing drywall dust from your walls.
Why Drywall Dust is Such a Pain
Before we dive into the "how," let’s talk about the "why." Drywall dust is essentially made of gypsum, silica, and calcium carbonate. When it’s sanded down, it becomes incredibly fine: finer than flour. Because it’s so light, it stays airborne for hours (sometimes days) and has an almost magnetic attraction to vertical surfaces like your walls.
The biggest mistake people make? Treating it like regular household dust. If you go in with a soaking wet sponge, you’re essentially recreating the joint compound (mud) that the contractors just sanded off. You’ll end up with streaks that are incredibly hard to remove once they dry.
How to Spot the "Invisible" Dust
Drywall dust is a master of disguise, especially on light-colored walls or in rooms with flat lighting. You might think a wall is clean, only to come back later when the sun hits it at an angle and realize it’s still covered in white powder.
Here are two ninja tricks to spot the dust:
- The Flashlight Test: Turn off the overhead lights and grab a high-powered flashlight. Hold the light flush against the wall so the beam shines across the surface rather than directly at it. This "grazing light" will highlight every bump, fingerprint, and layer of dust that was previously invisible.
- The Black Glove (or Cloth) Test: Put on a black nitrile glove or grab a piece of dark microfiber cloth. Gently pat a few different spots on the wall at various heights. If the dark material comes away with a white residue, you’ve got work to do.
Phase 1: The Dry Phase (Don’t Skip This!)
The secret to a streak-free finish is removing as much dry material as possible before any moisture touches the wall.
Step 1: The Soft Brush Down
Start by using a soft-bristled broom or a dedicated wall brush. Start at the top of the wall and work your way down in long, sweeping motions. You aren't trying to scrub; you’re just trying to dislodge the heavy hitters.
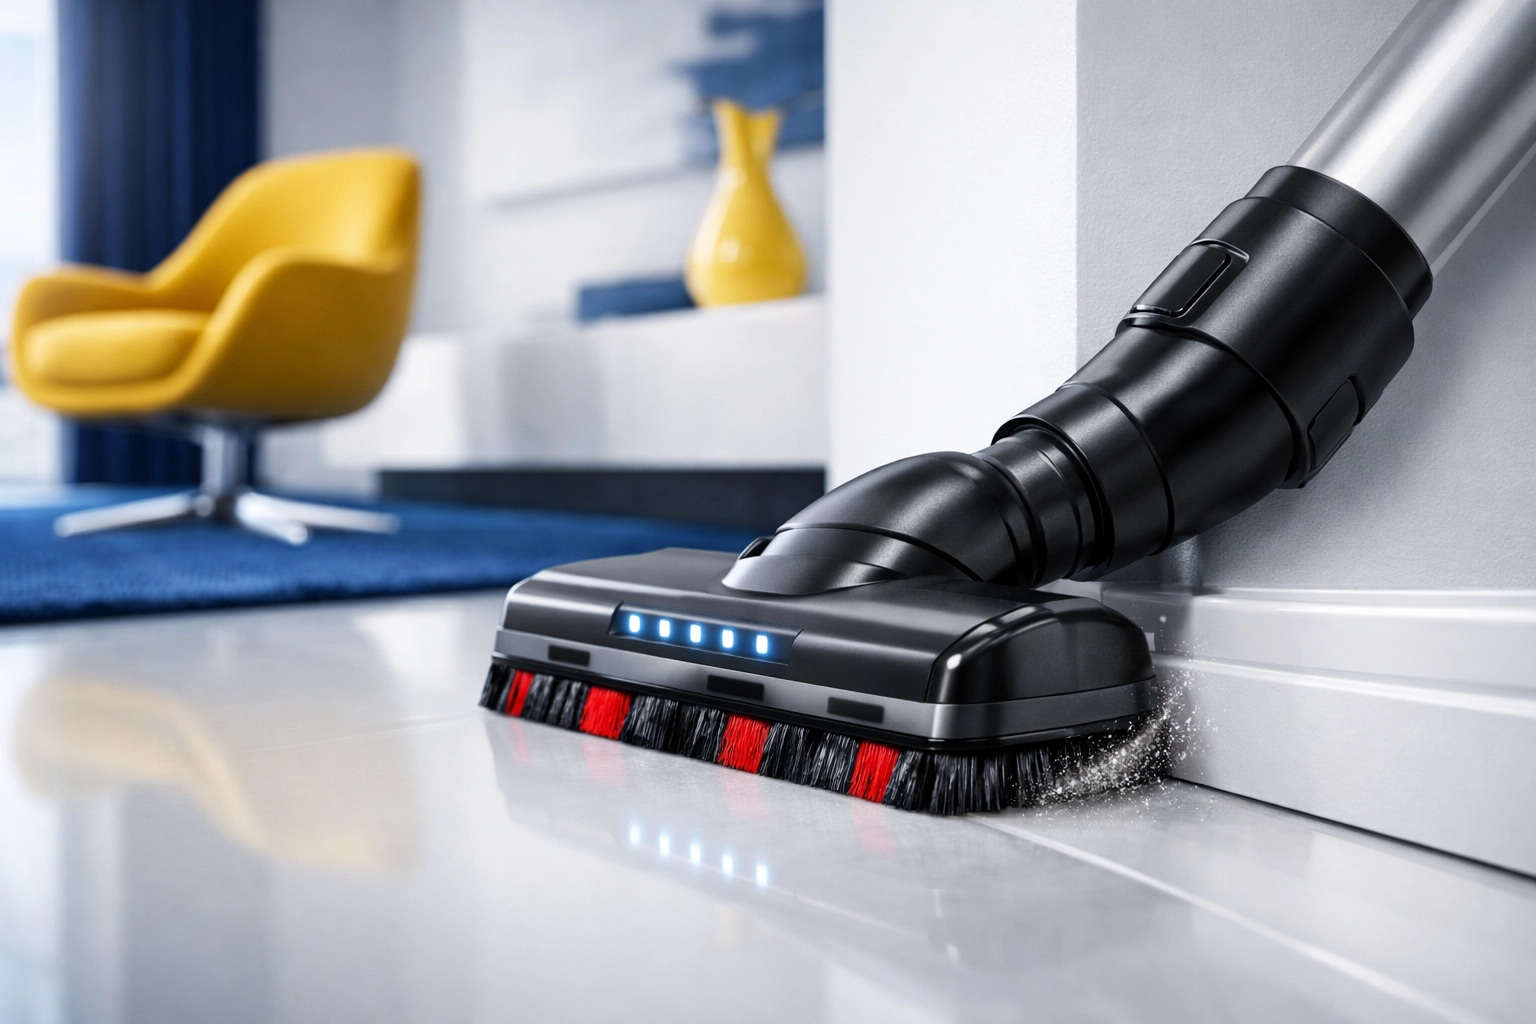
Step 2: The HEPA Vacuum
If you take away one tip from this entire post, let it be this: Use a HEPA-filtered vacuum. A standard shop vac or a regular household vacuum often has filters that are too porous. They’ll suck the drywall dust in and blow it right back out the exhaust, redistributing it into the air.
Attach a wide brush tool to your HEPA vacuum and go over the walls slowly. Again, work from top to bottom. Pay extra attention to the corners where the wall meets the ceiling and the baseboards, as dust loves to huddle there.
Phase 2: Eco-Friendly Damp-Dusting
Once you’ve vacuumed, you’ll likely still see a faint "ghost" of dust. This is where damp-dusting comes in. We love this method because it’s effective and totally eco-friendly.
What You’ll Need:
- Two buckets of lukewarm water.
- A few drops of mild, eco-friendly dish soap (optional).
- Several high-quality microfiber cloths.
- A flat-head mop (optional, for reaching high spots).
The Technique:
The key word here is damp, not wet. Dip your microfiber cloth into the water and wring it out until it’s barely moist. If you can squeeze a single drop of water out of it, it’s still too wet.
Wipe the wall in a "Z" pattern, starting from the top left and moving across and down. The microfiber's tiny fibers are designed to trap particles rather than just pushing them around.
The Two-Bucket System:
Use one bucket for your clean, soapy water and the second bucket for rinsing your dirty cloth. This ensures you aren't dipping a dust-covered rag back into your clean supply. Change your rinse water frequently. If the water looks like milk, it’s time for a fresh bucket.
The "Water Spray Hack" for Large Areas
If you’re dealing with a massive space that hasn't been painted yet (just bare drywall and sanded joints), some pros use a water spray method. You can use a clean garden sprayer or a paint sprayer filled with plain water to lightly mist the walls. The moisture "locks" the dust in place. However, you have to be careful not to oversaturate the drywall paper. At The Cleaning Ninjas Inc, we generally recommend the damp-dusting method for finished homes to ensure your paint and trim stay protected.
Common Mistakes to Avoid
Even the most well-intentioned DIY cleaners can run into trouble. Avoid these pitfalls to keep your walls looking pristine:
- Using Traditional Dusters: Feather dusters or cheap polyester dusters just flick the dust into the air. It’ll land back on the wall ten minutes later. Stick to microfiber or vacuums.
- Too Much Pressure: When damp-dusting, don’t scrub. If the paint is fresh (less than 30 days old), it might still be "tender." Heavy scrubbing can cause burnishing (shiny spots) or even lift the paint.
- Ignoring the "Loop": Dust settles in a cycle. You clean the walls, then the air vents kick on and blow more dust from the ceiling onto the walls. Make sure to wipe down your ceiling fans and change your HVAC filters after you’ve done your first pass on the walls.
Cleaning Different Finishes
Not all walls are created equal. How you clean depends on the finish:
- Flat/Matte Paint: These are the trickiest. They are porous and "grab" dust. Use the absolute minimum amount of moisture possible to avoid water spots.
- Satin/Semi-Gloss: These are much more forgiving. You can use a bit more pressure and a slightly damper cloth without worrying about damaging the finish.
- Wallpaper: Check the manufacturer's instructions. Usually, a dry HEPA vacuum with a soft brush is the safest bet.

Why Post-Construction Cleaning is Different
Post-construction cleaning isn't just "regular cleaning but more." It requires specialized equipment and a systematic approach to ensure the air quality in your home is safe. Drywall dust is an irritant; it can dry out your skin, irritate your eyes, and be tough on your lungs.
If you’ve just finished a big renovation and the thought of wiping down every square inch of your home feels overwhelming, that’s where we come in. Our Post-Construction Cleaning services are designed to handle the heavy lifting so you can actually enjoy your new space. We have the industrial HEPA vacuums and the "Ninja" techniques to get the job done right the first time.
Finishing Touches
After you’ve wiped down the walls, take a look at your baseboards and window sills. Drywall dust loves to settle on horizontal ledges. A quick wipe with a damp microfiber cloth should do the trick.
Finally, give it 24 hours. Sometimes, as the walls fully dry, a tiny bit of "haze" might reappear. Don't panic! This is normal. A final, quick pass with a dry microfiber floor mop (the kind with the swivel head) used on the walls will usually pick up those last remaining particles.
Renovating is stressful enough: cleaning up doesn't have to be. By using the right tools and a little bit of patience, you can banish the dust and let your home’s new look shine. For more expert advice, feel free to check out our other cleaning tips or reach out to us directly to see how we can help make your home sparkle!


