

When you think about cleaning your kitchen, what usually comes to mind? Wiping down the countertops, scrubbing the sink, maybe finally tackling that mystery spill in the back of the "crisper" drawer? Most of us focus on the parts of the kitchen we can see. But here at The Cleaning Ninjas Inc, we like to look a little deeper. There is a hidden hero in your kitchen that works 24 hours a day, 7 days a week, and it is likely covered in a thick layer of dust right now.
We’re talking about your refrigerator coils.
It might not be the most glamorous chore on your list, but cleaning your refrigerator coils is one of the single most effective ways to save money on your electric bill and prevent your fridge from kicking the bucket prematurely. In fact, keeping these coils clean can increase your fridge's efficiency by up to 30%. That’s a huge win for your wallet and the environment.
In this edition of The Cleaning Ninjas Tip, we’re going to walk you through exactly why these coils matter, the tools you’ll need to get the job done, and a step-by-step guide to doing it like a pro.
Why Your Fridge Coils Are So Important
Before we get our hands dirty, let’s talk about the "why." Your refrigerator works by removing heat from the inside of the box and releasing it into the air outside. The coils (also known as condenser coils) are the components responsible for dissipating that heat.
When these coils are clean, the heat escapes easily. However, because they are usually located near the floor or at the back of the unit, they act like a magnet for dust, pet hair, and kitchen grease. Over time, this buildup creates a layer of "insulation" over the coils. Instead of the heat escaping, it gets trapped. This forces your refrigerator's compressor to work twice as hard to keep your milk cold.
A compressor that’s constantly running isn't just noisy; it’s burning through electricity and wearing itself out. By spending 15 minutes cleaning the coils, you’re essentially giving your fridge a "breath of fresh air."
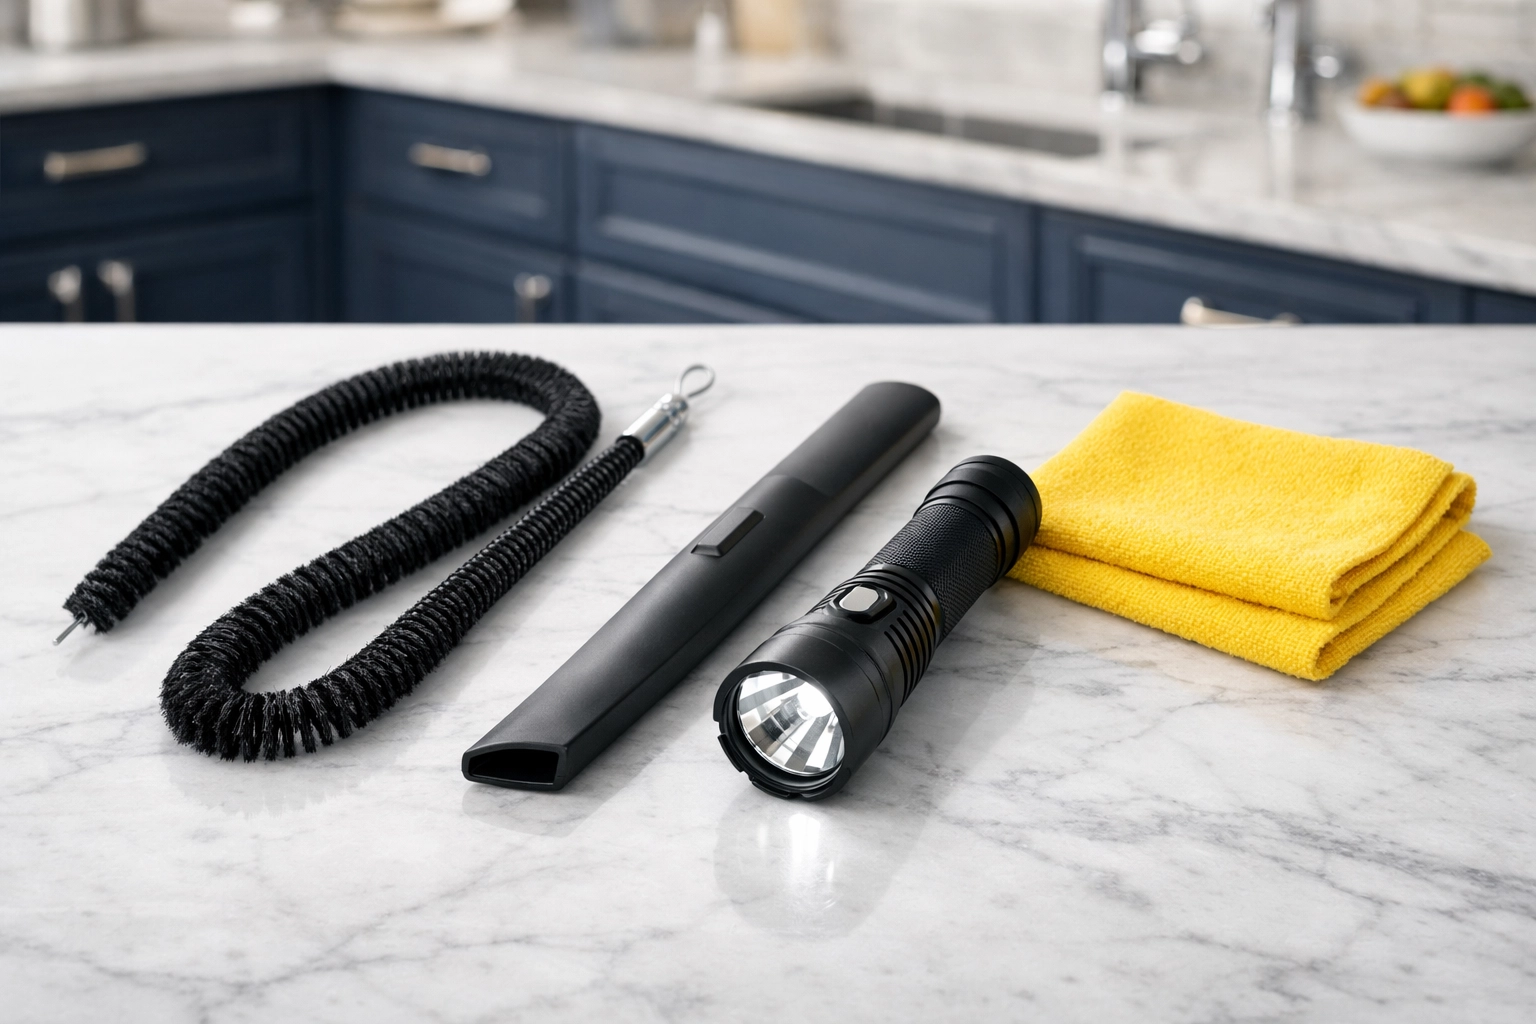
Gathering Your Ninja Gear
You don’t need a specialized degree in appliance repair to do this, but you do need a few specific tools to make the job efficient. Here is your checklist:
- A Coil Cleaning Brush: This is a long, thin, flexible brush designed specifically to get into the narrow gaps between the coils. You can find these online or at most hardware stores for a few dollars.
- A Vacuum with a Hose Attachment: A crevice tool or a soft brush attachment is perfect for this.
- A Screwdriver: Depending on your fridge model, you might need a flathead or Phillips head to remove the base grille.
- A Dust Mask: If it’s been a few years since you’ve done this, things are going to get dusty.
- A Flashlight: It’s dark under there!
Step 1: Safety First (Unplug!)
We cannot stress this enough: always unplug your refrigerator before you start messing with the coils. You’ll be working near electrical components and moving parts like the condenser fan. Pull the unit away from the wall carefully: be mindful of your flooring: and pull the plug. If your fridge has an ice maker or water dispenser, be careful not to kink or pull the water line.
Step 2: Locate the Coils
Where are they hiding? It depends on your model.
- Bottom-Front: Most modern refrigerators have the coils located behind a "kickplate" or grille at the very bottom of the front.
- The Back: Older models often have a large black grid of coils attached to the back of the unit.
- Bottom-Rear: Some newer high-end models have the coils located at the bottom but accessible only from the back.
If your coils are at the front, you’ll usually just need to snap off the plastic grille. Some might have a couple of screws holding them in place. If they are at the back, you’ll have a clear view of them once you’ve pulled the fridge out.
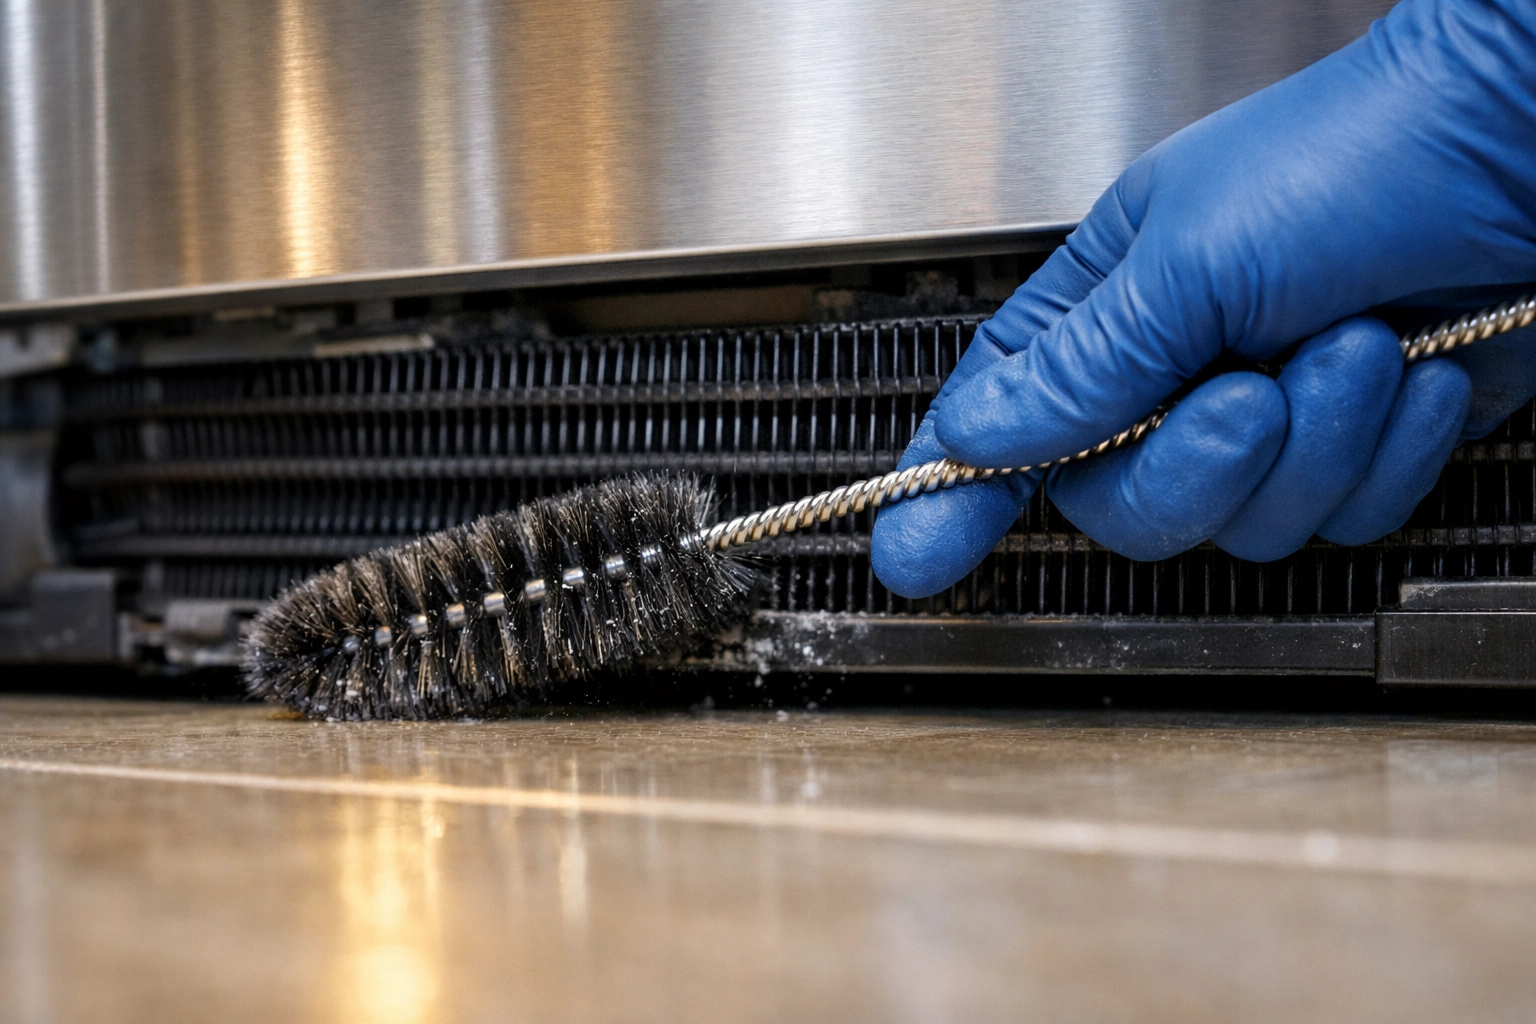
Step 3: The Brushing Phase
Once you can see the coils, you’ll likely see a thick "blanket" of grey dust. This is where your coil brush comes in. Gently slide the brush into the spaces between the coils. Use an up-and-down or back-and-forth motion to break the dust loose.
Ninja Tip: Try to follow the direction of the "fins" (the little metal slats) rather than going against them. You want to avoid bending them, as bent fins can also reduce airflow. If you have pets, you’ll likely find a lot of hair tangled in here. The brush is the best way to snag that hair and pull it out.
Step 4: The Vacuum Mission
Now that you’ve loosened the dust, it’s time to get rid of it. Use your vacuum’s crevice tool to suck up the big clumps. Then, switch to the brush attachment to gently go over the surface of the coils.
Don’t stop at the coils! Vacuum the floor underneath the fridge and the surrounding area. Dust likes to travel, and if the floor is dirty, that dust will find its way back onto your coils in no time. If your fridge has a condenser fan (usually located near the coils at the back), give that a quick vacuum too. A dusty fan can’t spin at full speed, which further hampers cooling.
Step 5: The Deep Clean (Optional)
If you really want to go the extra mile, you can use a can of compressed air to blow out any dust that the vacuum couldn't reach. Just a warning: this will send dust flying everywhere, so make sure you have your mask on and be prepared to vacuum the floor one last time afterward.
Step 6: Reassemble and Power Up
Once everything looks shiny and new (or at least no longer fuzzy), it’s time to put things back together. Replace the grille or kickplate. If you removed screws, make sure they are snug.
Push the refrigerator back into its original spot. If you have a tight space, try to leave at least an inch or two of clearance between the back of the fridge and the wall to allow for better airflow. Plug the unit back in and listen. You might notice that the fridge sounds a bit quieter or that it doesn't need to kick on as frequently as it did before.

How Often Should You Do This?
For most households, cleaning the coils once or twice a year is plenty. However, if you have shedding pets (looking at you, Golden Retrievers and Huskies!), you might want to check them every three to four months. Pet hair is particularly good at clogging up condenser coils and forcing the motor to strain.
Signs Your Fridge Coils Are Dirty
How do you know it’s time for a cleaning if you haven't been keeping track? Watch for these red flags:
- The Fridge is Running Constantly: If you feel like your fridge never stops humming, the coils are likely the culprit.
- It’s Not Cold Enough: If your drinks feel "cool" rather than "cold," the heat isn't escaping properly.
- The Sides Feel Hot: If the exterior walls of the refrigerator feel unusually warm to the touch, the system is struggling to dissipate heat.
- Higher Electric Bills: An inefficient fridge can add a surprising amount to your monthly utility costs.
Wrap Up: Small Task, Big Impact
At The Cleaning Ninjas Inc, we’re all about the details that make a home run smoother. Cleaning your refrigerator coils is a classic example of "preventative maintenance." It’s a small time investment that pays off in the form of a lower carbon footprint, lower bills, and avoiding the high cost of a new refrigerator.
If you’re feeling overwhelmed by the deep cleaning needs of your home, remember that you don't have to do it all alone. While we love sharing these DIY tips, our team is always ready to step in and handle the heavy lifting for you. You can learn more about what we do on our About Us page or check out the full range of our services to see how we can help you keep your home in tip-top shape.
For more home maintenance hacks and deep-cleaning secrets, be sure to head over to our blog. We’re constantly adding new guides to help you master your domain, one room at a time.
Now, go grab that vacuum and give your fridge the spa day it deserves! Your milk (and your wallet) will thank you.


