

We’ve all been there. You’re walking through your home, feeling good about the tidy state of things, when the afternoon sun hits the hallway wall at just the right angle. Suddenly, there it is, a giant, greasy fingerprint near the light switch. Or maybe it’s a mysterious black scuff mark at knee height, or a faint trail of crayon where your little "artist" decided the drywall was a canvas.
At The Cleaning Ninjas Inc, we know that walls are often the most overlooked part of a home’s cleanliness. We scrub the floors, we polish the counters, but the walls? They just kind of hang out there, collecting dust, oils, and smudges until they start to look a little… dingy. The problem is that many people are terrified to touch their walls because they don't want to ruin the paint. A "clean" wall with a giant, faded bald spot from over-scrubbing is arguably worse than the smudge itself.
In this edition of our Ninja Tips, we’re going to show you how to tackle those wall smudges like a pro. We’re talking about effective removal that keeps your paint looking pristine, vibrant, and, most importantly, still on the wall.
Know Your Enemy: The Paint Finish
Before you grab a sponge and go to town, you need to understand what you’re working with. Not all paint is created equal, and the finish (or sheen) of your paint determines how much "tough love" it can handle.
Flat or Matte Finishes
These are the most common in bedrooms and living areas because they hide imperfections in the drywall. However, they are also the most delicate. Flat paint is porous, meaning it holds onto dirt and is easily "burnished" (made shiny or rubbed off) if you scrub too hard. You have to be incredibly gentle here.
Eggshell and Satin Finishes
A step up in durability, these have a slight luster and are common in hallways and kids' rooms. They can handle a bit more moisture and light rubbing, but they still require a soft touch.
Semi-Gloss and Gloss Finishes
Usually found on trim, baseboards, and in kitchens or bathrooms. These are the ninjas of the paint world, tough, moisture-resistant, and ready for a more vigorous cleaning. You can usually scrub these without fear of stripping the color, but you still want to avoid harsh chemicals.

The Ninja Golden Rule: Start Small and Gentle
When we provide our services, we always follow a "progressive" cleaning strategy. You never want to use a sledgehammer when a feather duster will do. The same applies to your walls.
The goal is to remove the smudge while leaving the paint finish completely intact. To do this, always start with the mildest method possible and only move to something stronger if the smudge refuses to budge.
Step 1: The Dry Dusting
Believe it or not, some "smudges" are actually just accumulated dust or cobwebs that have been pressed into the wall. Before applying any liquid, take a clean, dry microfiber cloth and gently wipe the area. If the mark is loose debris, you’ll avoid turning it into a muddy streak by skipping the water initially.
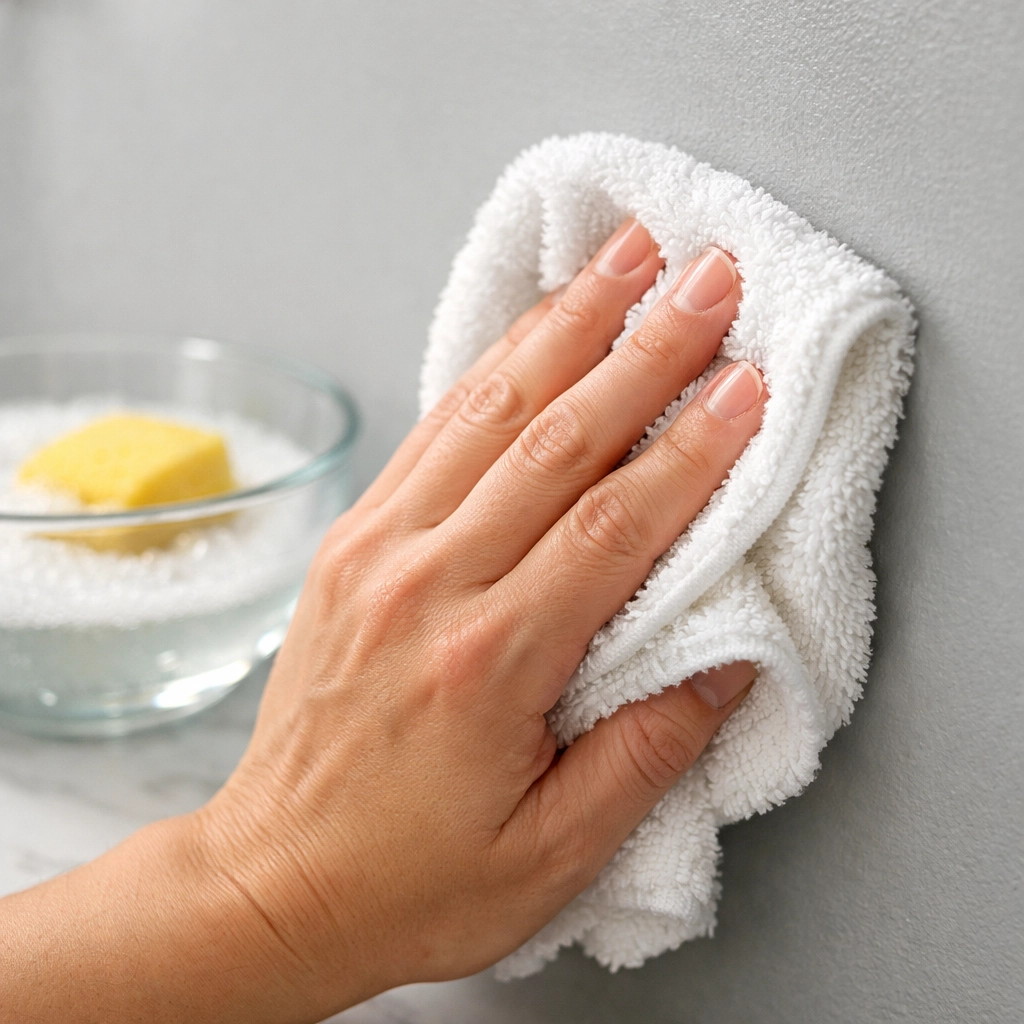
Step 2: The Magic of Warm Water and Mild Soap
If the dry wipe didn't work, it’s time to bring in the heavy hitter: dish soap. Yes, plain old grease-cutting dish soap is usually all you need.
- The Mix: In a small bucket or bowl, mix warm water with just a drop or two of mild dish soap. You want it slightly sudsy, but not a bubble bath.
- The Cloth: Use a white microfiber cloth. Why white? Because colored cloths can sometimes transfer dye onto light-colored walls, creating a whole new problem.
- The Technique: Dip the cloth in the soapy water and wring it out until it is barely damp. You should never have water dripping down your walls: that creates streaks that are hard to remove.
- The Rub: Gently wipe the smudge in a circular motion. Don't press too hard. Let the soap do the work of breaking down the oils from fingerprints.
Dealing with Stubborn Marks: The Baking Soda Trick
If soap and water didn't do the trick, you might be dealing with something a bit more oily or stuck-on (think kitchen grease or a scuff from a rubber shoe). This is where baking soda comes in. It’s a mild abrasive, meaning it provides just enough "grit" to lift the stain without acting like sandpaper on your paint.
Create a paste using three parts baking soda and one part water. Dab a small amount of the paste onto a damp cloth and gently rub it over the smudge. Once the mark is gone, take a second damp cloth (plain water only) to wipe away the white residue left by the baking soda.
The "Cleaning Eraser" Warning
You’ve probably seen those white foam "magic" erasers at the store. They are amazing at removing marks, but here is the Ninja secret: they are actually made of melamine foam, which acts like extremely fine sandpaper.
If you use a cleaning eraser on a wall with a gloss or semi-gloss finish, it will likely dull the shine in that specific spot, leaving a permanent "flat" patch. If you use it on a dark-colored wall, it can actually "sand" away the pigment, leaving a light spot.
Ninja Tip: If you must use a cleaning eraser, use it only as a last resort. Wet it, squeeze out all the excess water, and use the lightest pressure possible. Always test it in a hidden spot first: like the wall space behind a door or inside a closet: to see if it affects the paint’s sheen.

Specific Stain Troubleshooting
Sometimes, life throws specific messes at your walls that require a targeted approach. Here’s how to handle the most common culprits:
- Crayons: If your toddler decided to decorate the living room, reach for a hairdryer. Set it to low heat and blow it directly onto the crayon marks. The wax will soften and melt, allowing you to wipe it away with a soapy cloth.
- Ink/Permanent Marker: This is the toughest one. Try dabbing a tiny amount of rubbing alcohol onto a cotton ball. Be very careful, as alcohol can dissolve paint. Dab, don't rub, and stop immediately if you see paint color transferring to the cotton ball.
- Pencil Marks: An actual pencil eraser (the soft white kind, not the pink ones that leave streaks) often works wonders.
- Grease Splatters: In the kitchen, grease can harden. A mixture of white vinegar and warm water can help cut through the grease without damaging the finish.
The Importance of the "Rinse and Dry"
One of the biggest mistakes people make when cleaning walls is leaving the cleaning solution on the surface to air dry. This often leaves a "halo" or a ring around where the smudge used to be.
Whenever you use soap, baking soda, or a cleaner, always follow up with a clean, damp cloth (water only) to "rinse" the area. Then, immediately take a dry microfiber cloth and buff the area dry. This prevents water spots and ensures the finish looks uniform once it's dry.
When to Call the Professionals
Cleaning walls is a tedious task, especially if you have high ceilings or a large home with a lot of "traffic" from pets and kids. While these DIY tips are great for spot-cleaning, sometimes a whole-house wall refresh is exactly what you need to make your home feel brand new again.
At The Cleaning Ninjas Inc, we take pride in our attention to detail. We understand the nuances of different paint types and the safest ways to restore that "just painted" look to your home. If you’re tired of chasing smudges or want a deep clean that covers every inch of your space, check out about us to see how we work.
Prevention: Keeping Walls Cleaner for Longer
Once your walls are pristine, you’ll want to keep them that way! Here are a few quick tips to prevent smudges from taking over:
- Dust Regularly: Use a microfiber mop or a vacuum with a brush attachment to dust your walls once a month. This prevents dust from settling and turning into grime.
- Wash Your Hands: It sounds simple, but teaching kids to wash their hands after eating or playing outside can significantly reduce the number of fingerprints on your walls.
- Check Your Air Filters: Dirty HVAC filters mean more dust circulating in the air, which eventually ends up on your vertical surfaces.
- Strategic Furniture Placement: Keep chairs and sofas an inch or two away from the wall to prevent "rub marks" from the furniture backing.
Keeping your paint pristine doesn't have to be a source of stress. By being gentle, using the right tools, and knowing when to stop, you can keep your home looking sharp. For more home maintenance advice, be sure to browse our other cleaning tips.
Whether it’s a single smudge or a whole house that needs a "Ninja" touch, we’re here to help. Happy cleaning!


